Changelog
Follow up on the latest improvements and updates.
RSS
We've just added the ability to set default fonts in your BuzzStream email composer to reduce manual work and add consistency across your outreach.
To access the default font option, just navigate to your composer settings screen

Then, set the default font and size to your preference

Now, whenever you compose a new email or create a new sequence, the default font will be the one you selected.

Note - if you have another font set for a sequence and select that sequence to use for outreach, your default font selection won't override those choices.
Today marks the launch of the highly anticipated Projects Dashboard feature for all our users—and it’s set to transform the way you manage your outreach projects. Say goodbye to the days of manually reviewing projects on an individual basis to assess their status or take action on next steps.
Introducing the Projects Dashboard: Your New BuzzStream Command Center
The Projects Dashboard isn’t a single feature—it’s your new command center for overseeing all your projects with unparalleled clarity and actionability. Whether you're deep in the trenches of outreach or overseeing the strategic direction of multiple campaigns, this tool is designed to streamline your workflow and make managing your projects a breeze.
Centralized Project Visibility
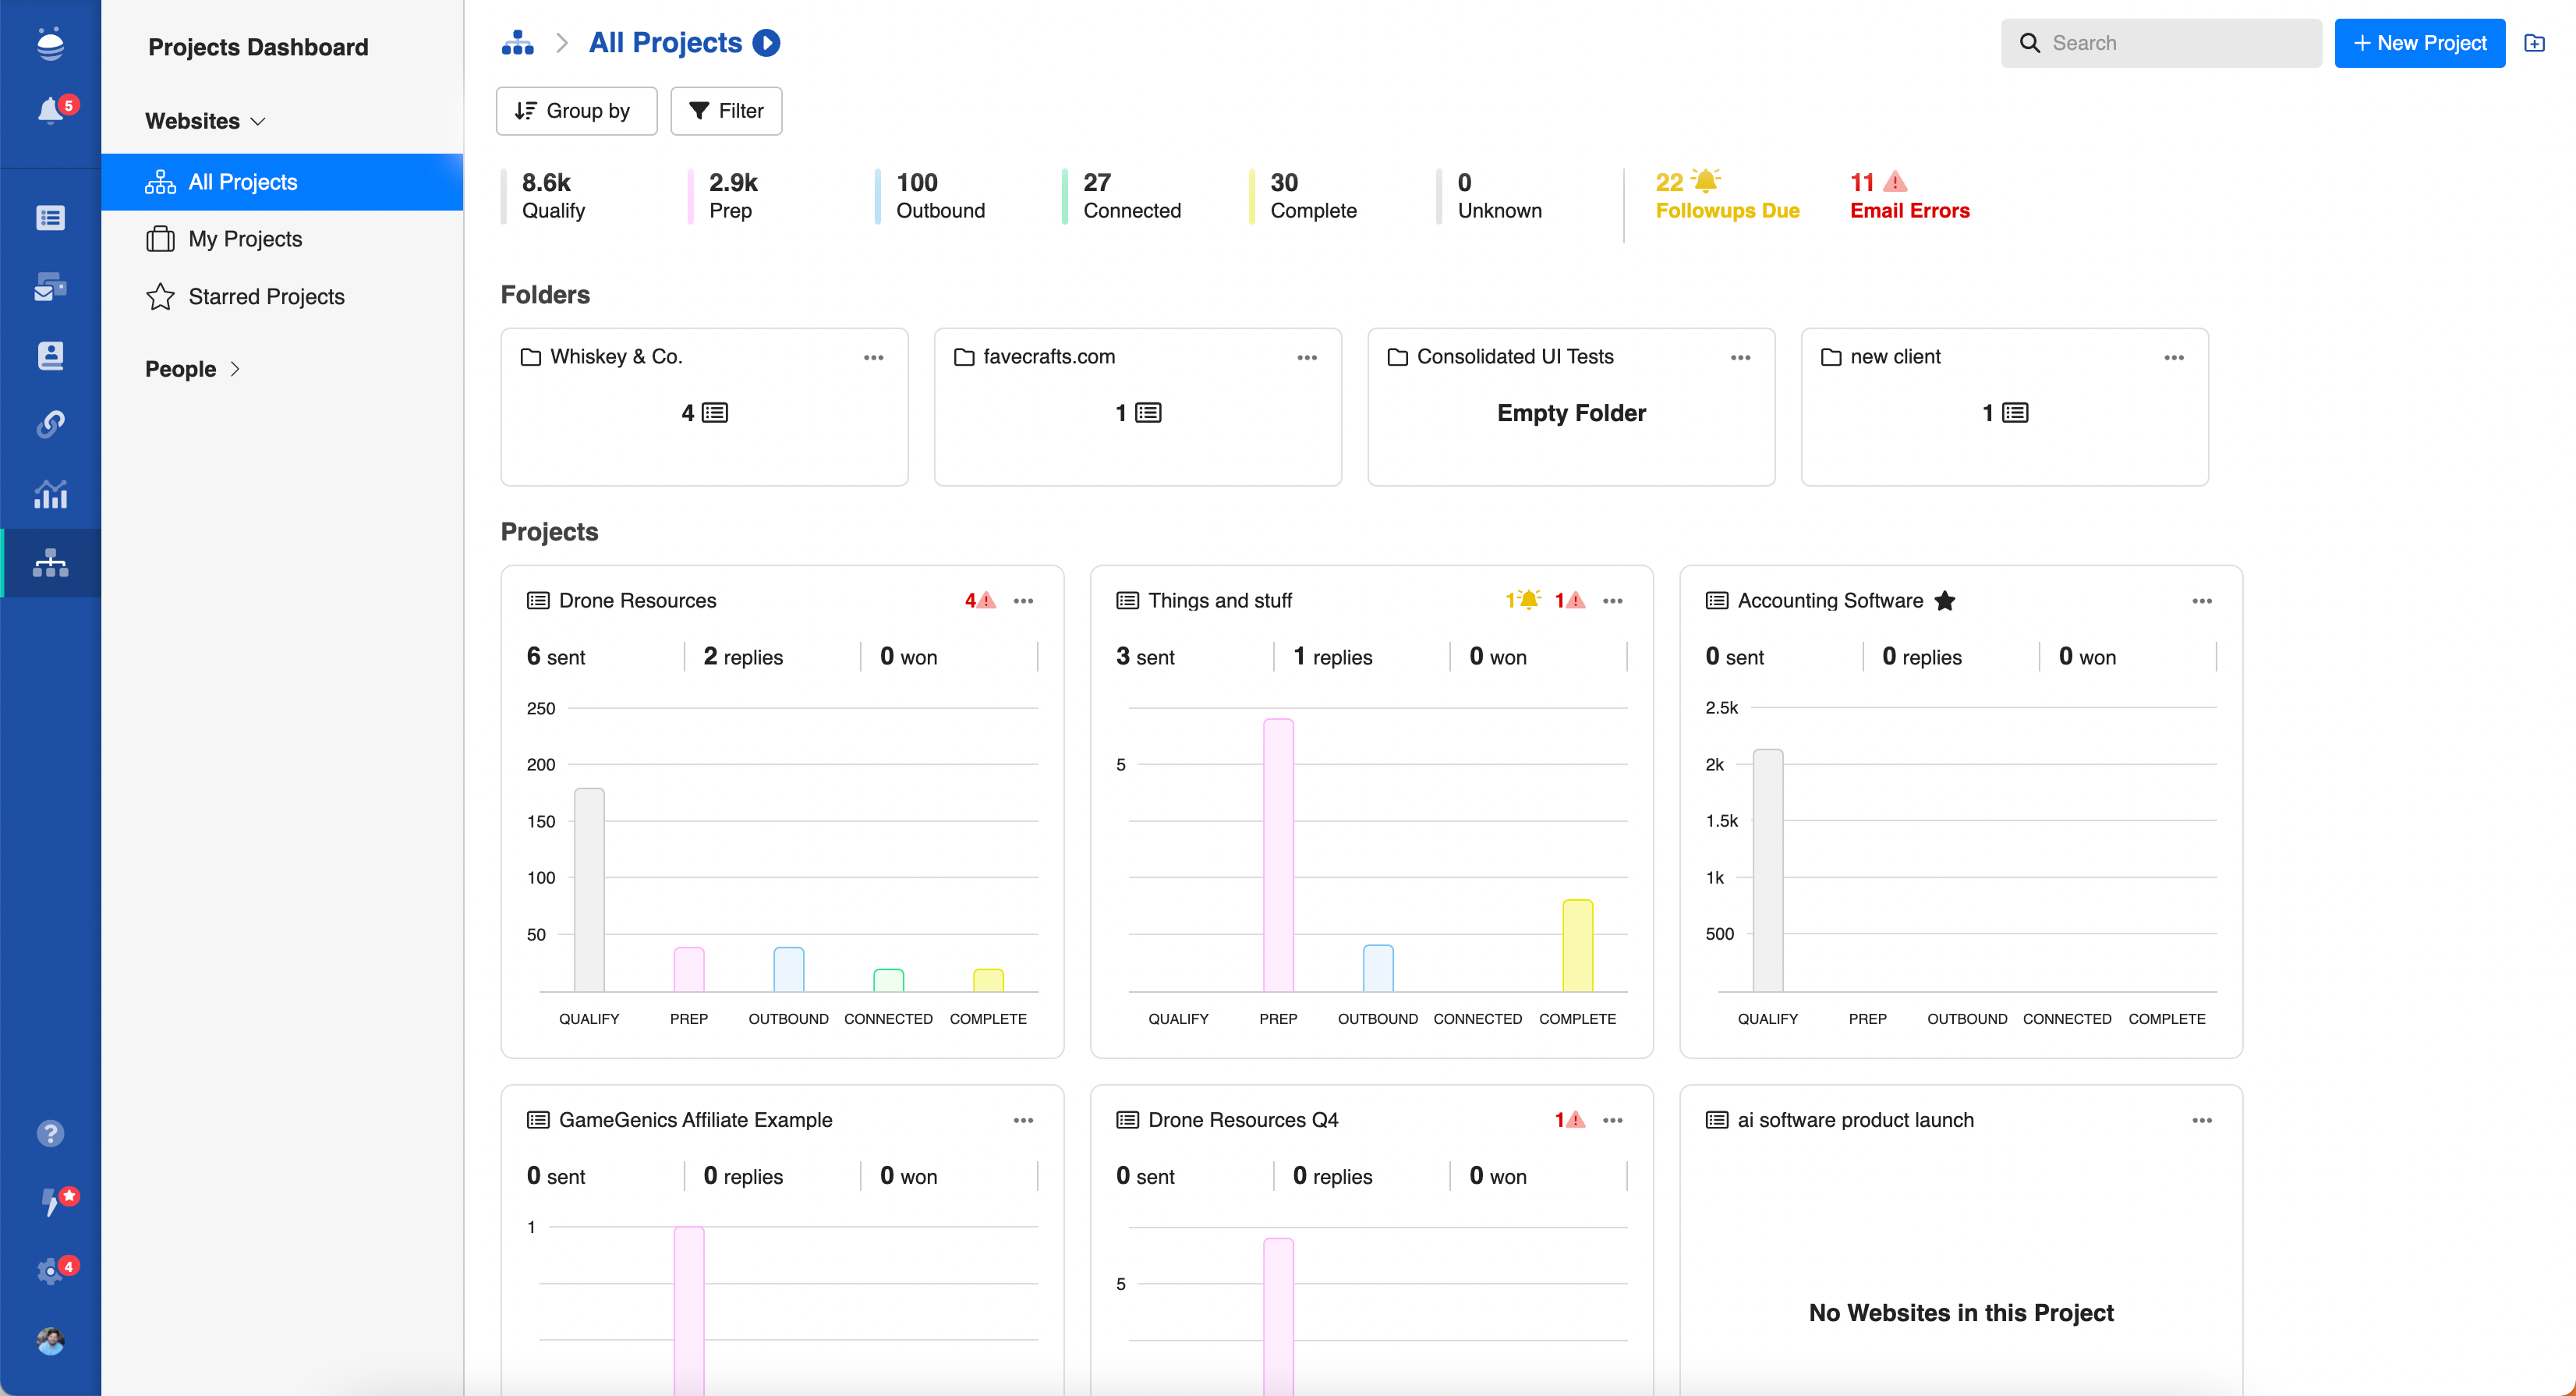
The most obvious immediate benefit the Projects Dashboard provides is centralized visibility into activities across all of your clients and campaigns. There is a tremendous amount of flexibility in the dashboard to display the right information for you, but let’s quickly take a look at how the information is organized by default.
Accessing your Projects Dashboard is super straightforward - just click the icon in your left navigation bar and you’re there.
When you first access the Projects Dashboard, you’ll see that the information there is organized into three distinct sections:
- Projects Overview
- Folders
- Projects
Let’s discuss the information in these sections in greater detail.
Projects Overview
The projects overview section exists at the top of your Projects Dashboard and fittingly provides overall insights across all projects in your current view. It will display what project phase all contacts across all projects in your view currently exist in. We’ll discuss project phases in more detail shortly - but the general concept is that they are groupings of relationship stages that reflect what stage in your project's lifecycle each contact exists in.

Using this information, you can get a general idea of how much activity is happening at each stage in your overall dashboard view, whether work is getting done, and where things are progressing normally or potentially getting hung up across your account.
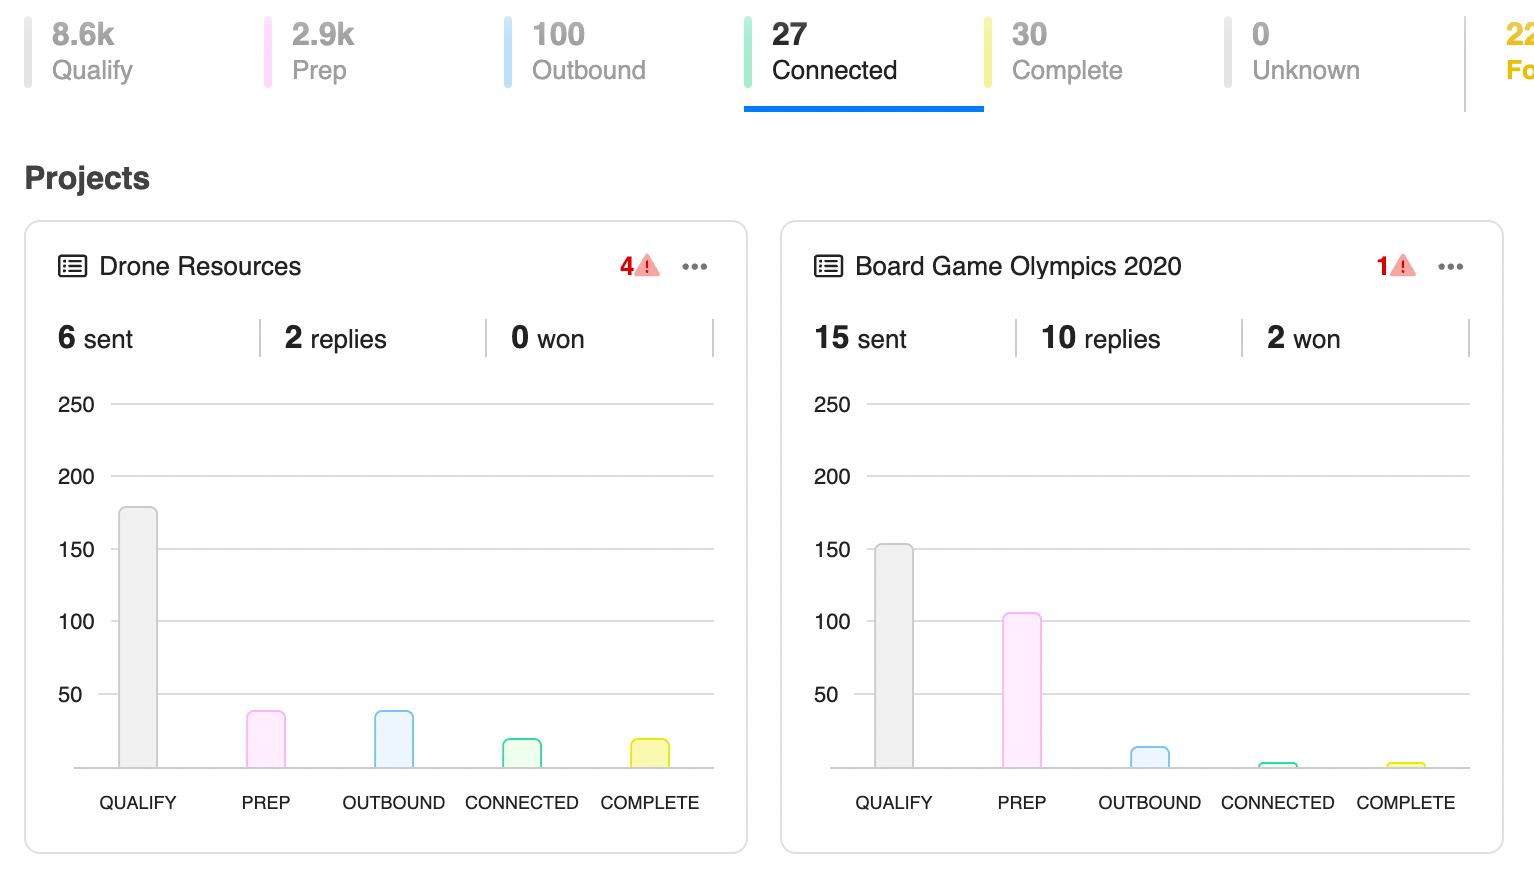
From the overview, you can also dive into projects that have contacts in a given phase or that have completed a certain outreach goal. For example, if I want to see and manage all of the projects where we’ve gotten replies, all I have to do is click the “Connected” phase and I’ll see the full list of relevant projects with contacts in that state.
You can change your dashboard view in several ways to change the information being displayed. If, for example, you are not a manager for your outreach team, but are concerned with the projects you are working on specifically, you can easily change the view by selecting “My Projects” from the projects view dropdown. You could also select “Starred Projects” to see only specific projects that you have defined as being particularly important.
Another way to change the view is by diving into a specific folder - which brings us neatly to our next section.
Folders
Folders, as you might expect, are based on your folder organization in your BuzzStream account. At a top level, you can review these folders to see the number of sub-folders and projects that exist within each.
When you click into a folder or sub-folder, you’ll notice that your view changes. Now, you are seeing a dashboard view specifically tied to that folder.
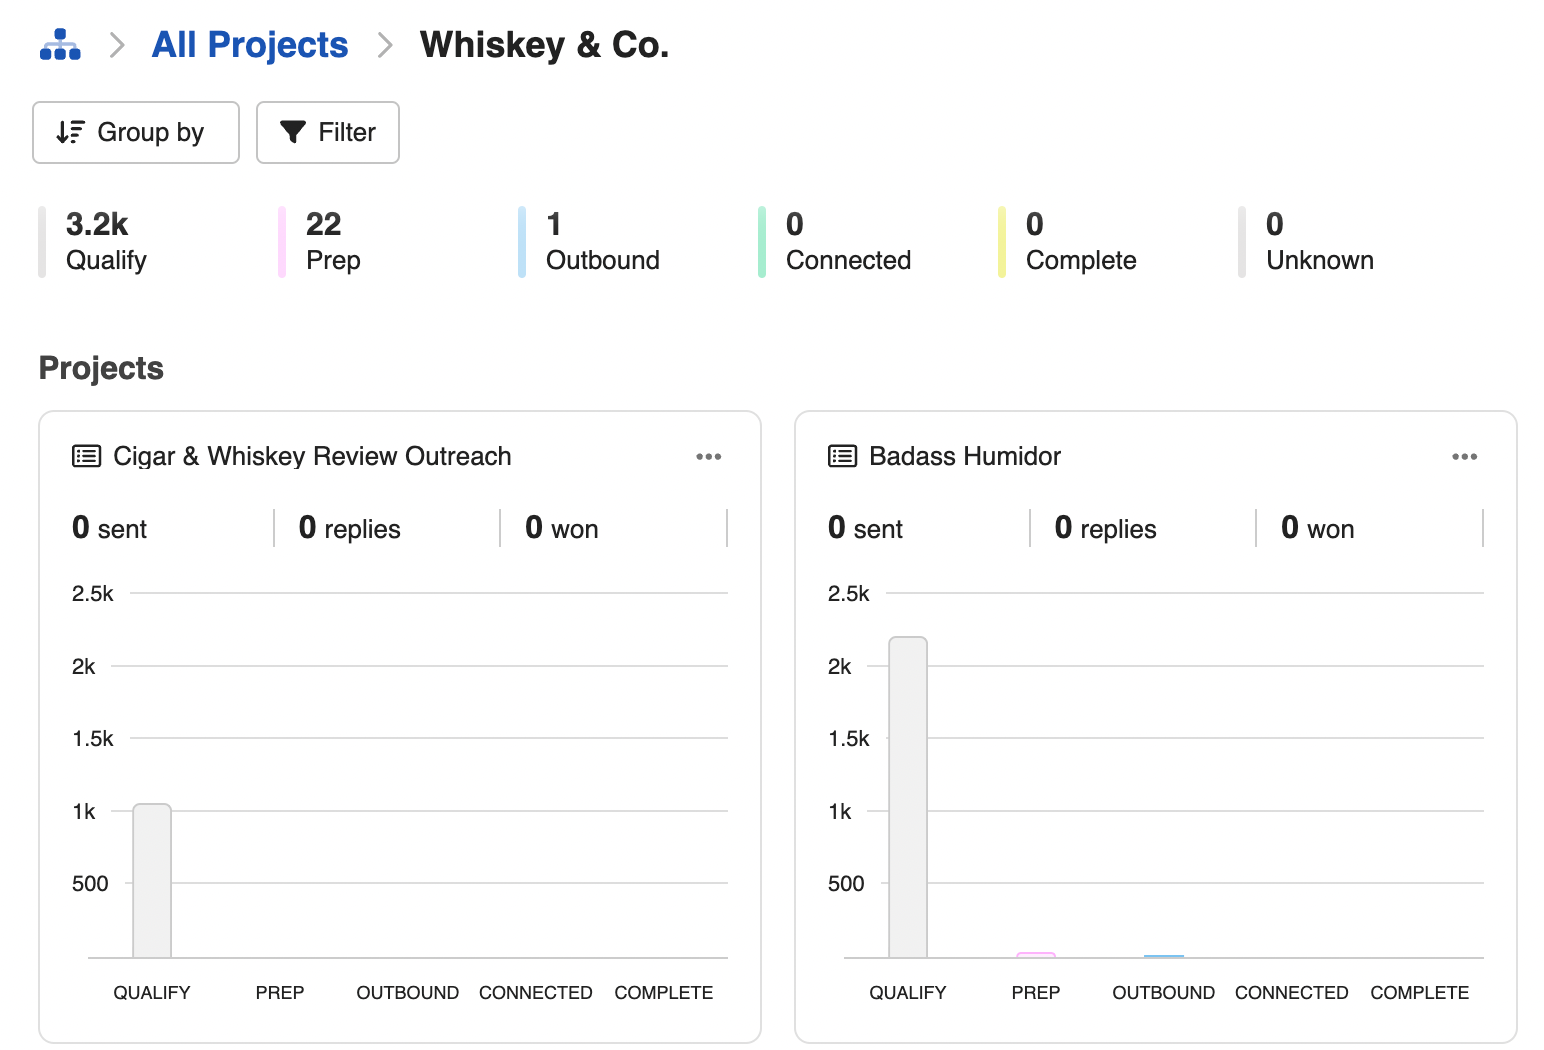
From here, you can get high level visibility into each folder. Often, that means understanding what is going on at the client level or campaign type level, giving you top-level insight targeted to where it matters. Want to know how things are progressing for that new client you onboarded? Or how your overall campaigns are performing for a given initiative? Your folder view makes getting that insight easy as a click.
Projects
Your projects section is where the real granular insights and actionability happen in your campaign dashboard. You’ll see in this section that each of your projects in your view is broken into a project tile. For each of those tiles, you can get a quick visual representation of where every contact in that project currently stands.
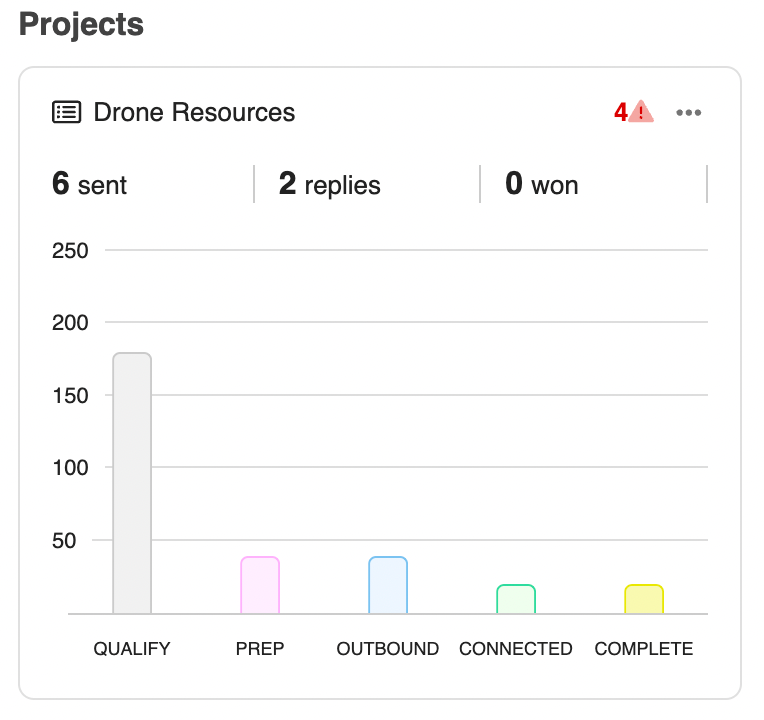
Looking more closely at the project tile, you can see that not only do you have visibility into what campaign phase each contact exists in, but you can also see top level email metrics as well as notification and error messages.
Efficient Project Actionability
Your Projects Dashboard doesn’t just provide insight. You can also take critical actions on many different aspects of your projects right from the project tile.
Many of these actions are phase dependent, and you can view those actions very easily by just clicking on the outreach phase in your project tile of choice.
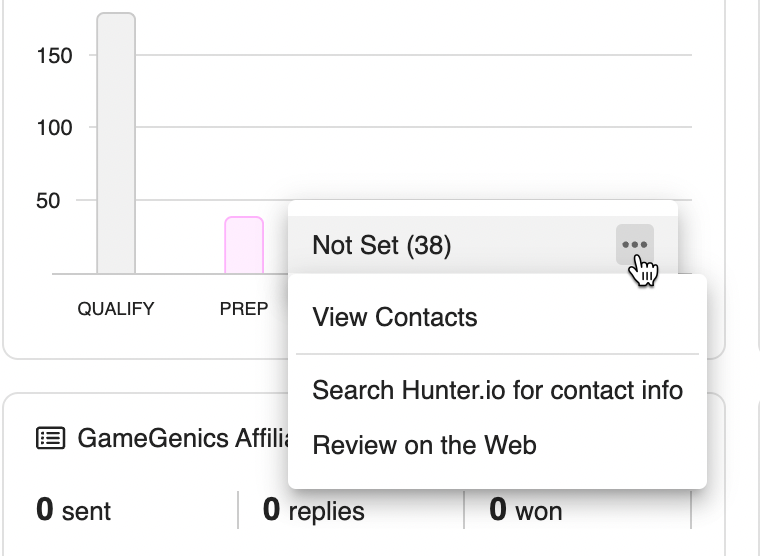
These contextual actions vary by phase, but you can use them to:
- View the list of all contacts that exist in that phase
- Launch into a BuzzMarker “Review on Web” workflow
- Search for contact info using our Hunter.io integration
In addition to phase dependent actions, you can also directly take action on project notifications or errors. Just click into the alerts section of your project tile and you can see all available actions available to you to resolve errors and stay on top of followup reminders and other critical tasks.
Consolidated Project Phases to Unify Visibility
Now let’s turn to those project phases we’ve been discussing to explore them in a little more detail. As discussed, project phases describe where in the general project lifecycle each of your contacts exists.
Those phases are:
- Qualify - Discover and vet prospects for your project.
- Prep - Get your contacts ready for outreach. This can include finding contact information and gathering info you’ll need to personalize or populate your sequences.
- Outbound - Manage your sent and scheduled outreach to contacts.
- Connected - Review contacts that you are currently in communication with.
- Complete - View contacts that have completed their outreach cycle.
Now - if you are familiar with BuzzStream you are likely already asking yourself: how the heck do these phases get populated? And what happened to my relationship stages!?
No need to worry dear reader, your stages are all good and well and are in fact integral to how project phases get populated!
The first time that you open the Projects Dashboard, and whenever you click “configure phases”, you’ll be taken to the “Edit Relationship Stage” screen. Here you’ll see the list of all of your relationship stages in a list to the right, and all of the project phases on the left.

Populating your phases is simple. Just drag your relationship stage of choice into the most applicable project phase, and it will begin populating that phase with contacts that exist in that given relationship stage.
And by the way, we’ll make a best guess on how to organize your stages, but you’ll likely want to review and adjust those to make sure they fit your expectations.
By handling phases this way, you’ve got all the flexibility to define relationship stages however you like, while still giving you unified visibility into where your projects stand. These can be modified at any time if the nature of a stage changes, or if you add a new stage that applies to a given phase.
improved
Updated unsubscribe options
We’ve updated the product to give users the options to handle unsubscribe capabilities in a way that makes sense for their team and make getting visibility into unsubscribe activities much easier and more intuitive.
New Unsubscribe Options
Previously, unsubscribe was an all or nothing game. If someone unsubscribed from an email, they were unsubscribed from getting emails from anyone using that BuzzStream account.
This ensured that no one was sent emails they didn’t want, but there were a lot of cases where that option really didn’t make sense. For example, what if you’re working on behalf of totally different brands or product lines using the same BuzzStream account, using totally different email addresses for each? A contact who isn’t interested in hearing about one of those doesn’t necessarily want to opt out of hearing from all of them.
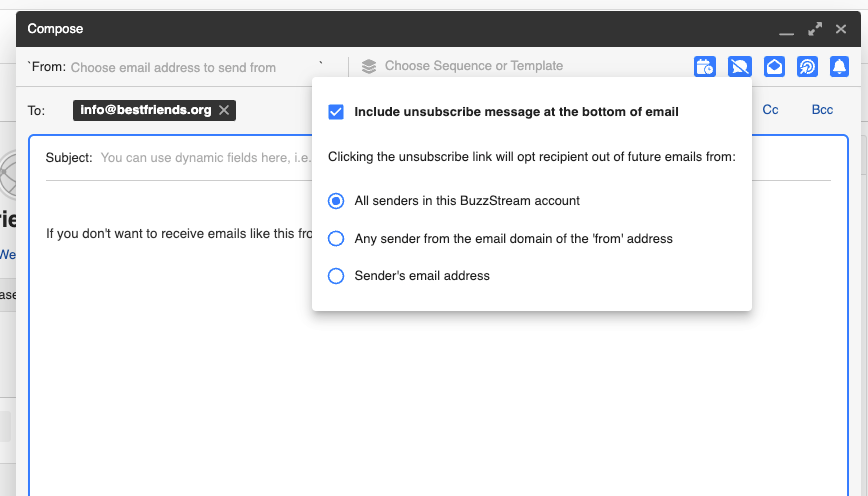
Given that, we’ve now added two additional options when you include your unsubscribe message in your emails. You can still opt contacts out of ever hearing from anyone in your account, but you can also modify the rule to only apply to opting out of senders using the email domain that the contact unsubscribed from, or even just from that specific email address that they unsubscribe from.
Accessibility
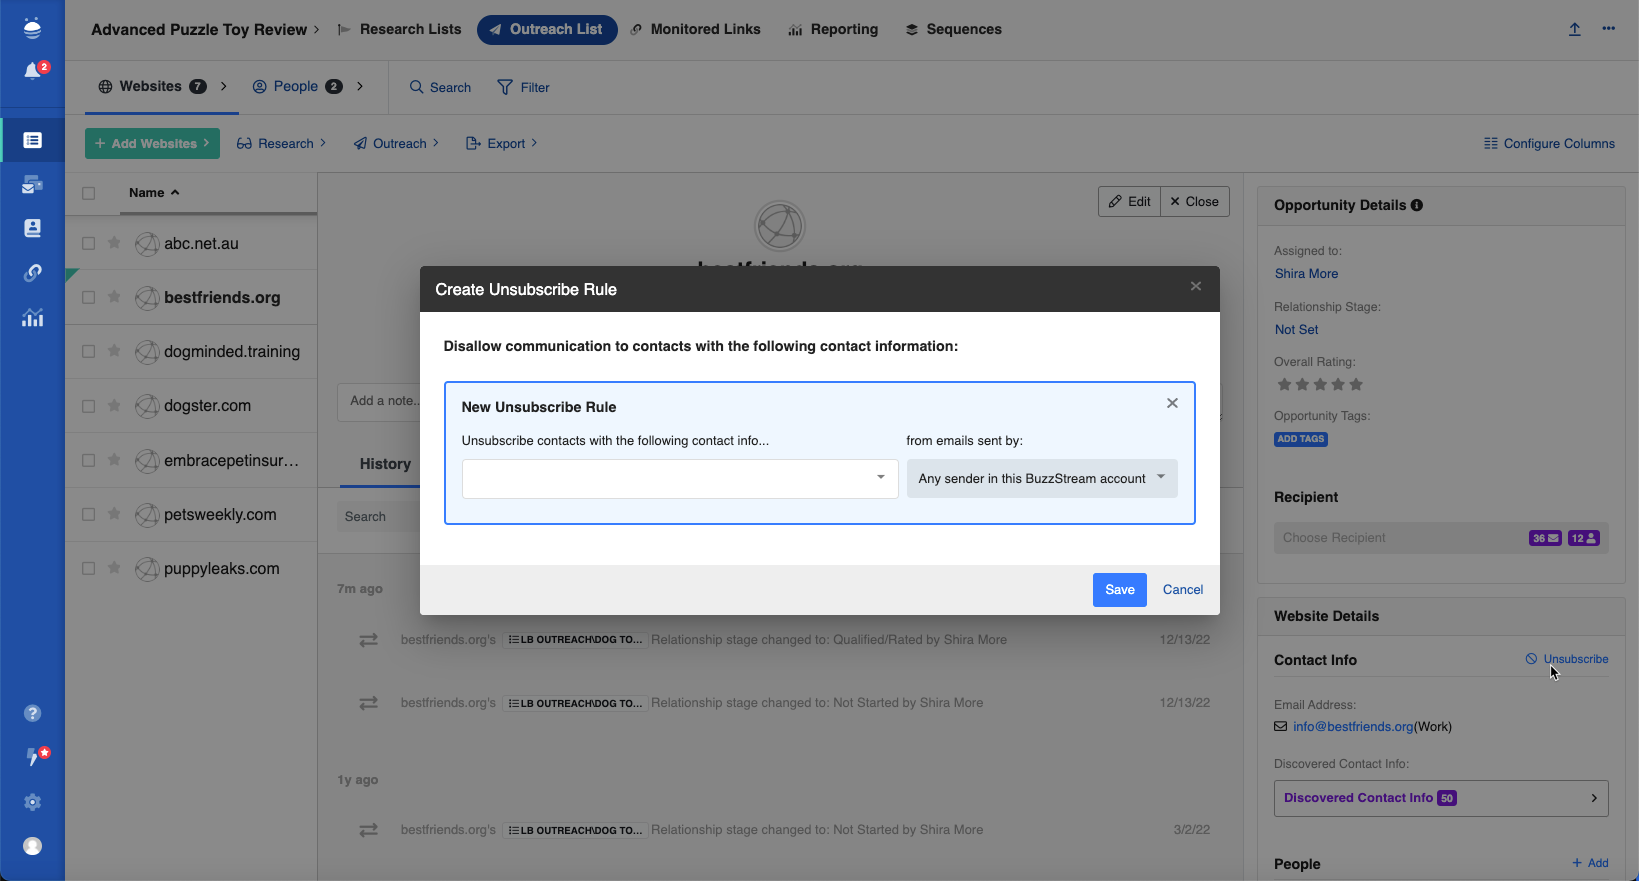
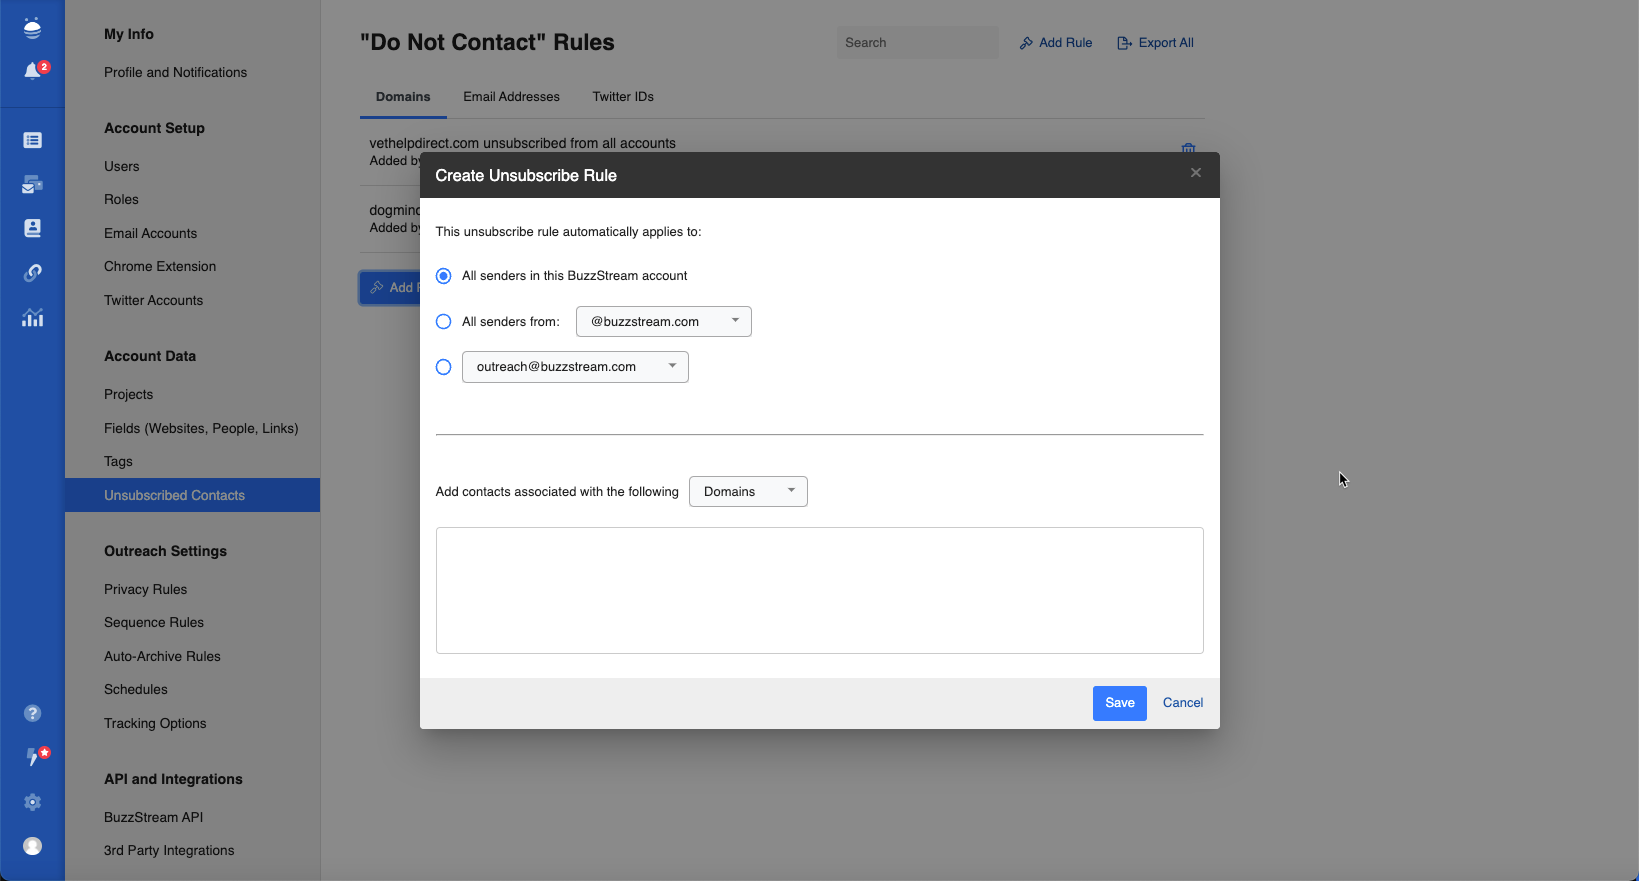
We also wanted to improve the ways people can access unsubscribe options when setting up their emails. You’ve already seen how unsubscribe settings work in the email composer, but you can also set your unsubscribe rules from the contact record
from bulk send

and from your unsubscribed contacts settings page
Visibility
In the unhappy case where a contact has unsubscribed from your emails, we will display that information as well as the specifics around the unsubscribe rule that has been set for the contact so you and your team are aware if there are other options available for reaching out.
We've added a filter to BuzzStream to only show prospects in a given project that don't exist in any other projects.

With this feature, you can make sure that you're only researching and reaching out to completely fresh prospects. This can be particularly helpful when you want to start a campaign that won't affect any existing relationships, or to make sure your team is focusing new relationship-building efforts only on prospects that your team has never interacted with before.
Previously, when you copied Websites to a new project, there wasn't a way to copy over the recipients that you contacted in the project you were copying from. We've added this as an option in the 'Copy to Project' modal.

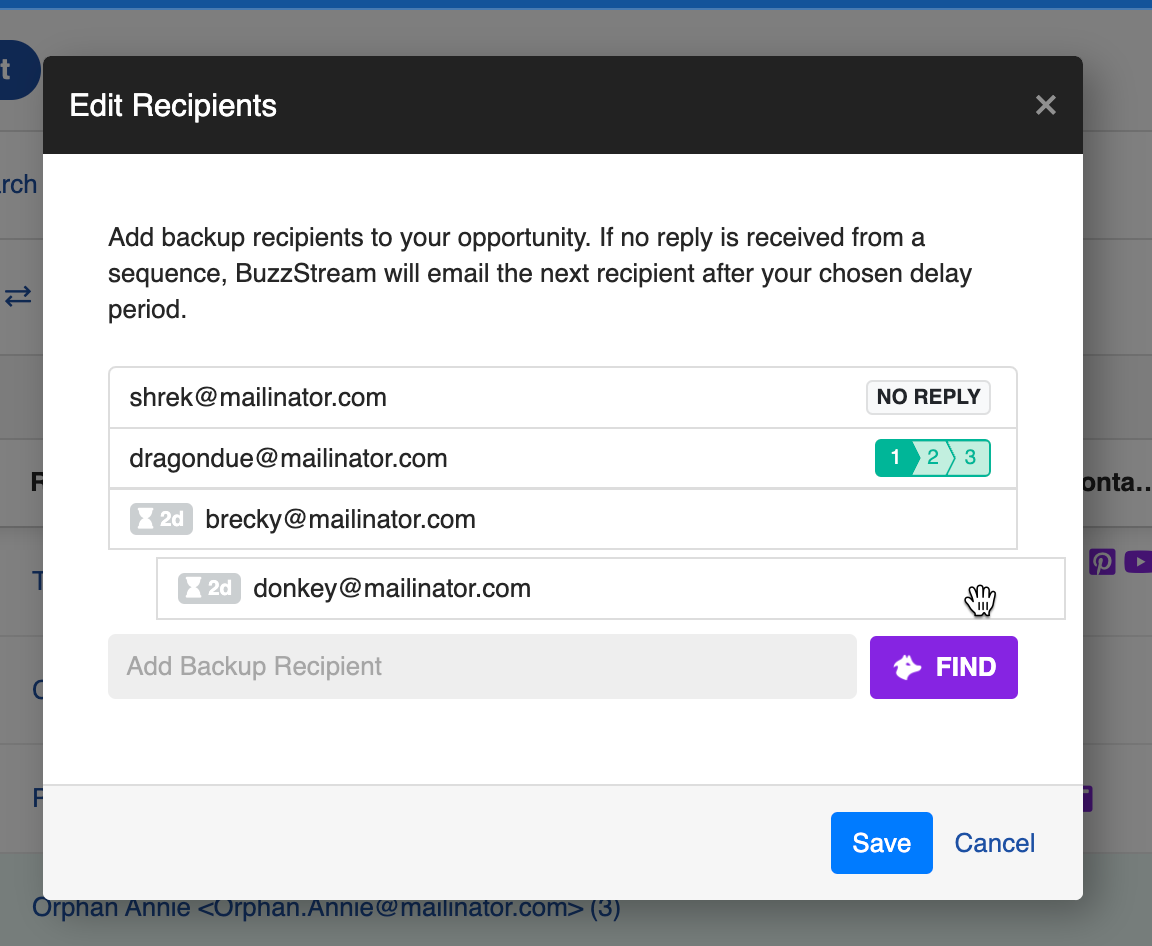
What are Backup Recipients?
Backup recipients are contacts at a website that are good targets for your outreach email, but may not be your first pick when choosing who to reach out to. It often makes sense to reach out to one of these contacts if you don’t hear back from your primary recipient, because in effect it increases the likelihood of landing that link or coverage.
The problem, historically, has been that this process can be very tedious and confusing to stay on top of. In order to do this systematically, you’d have to find a list of websites that didn’t respond to your outreach, replace the existing recipients on that website with qualified ones, send a new round of outreach, and then repeat the process all over again if you wanted to send to another backup recipient after that.
BuzzStream can now handle that whole process for you.
How Backup Recipients Work in BuzzStream
The new Backup Recipient functionality has been engineered to be really straightforward while also being flexible enough to adapt to the wide range of workflows users have in BuzzStream.
The basics of the feature are simple.
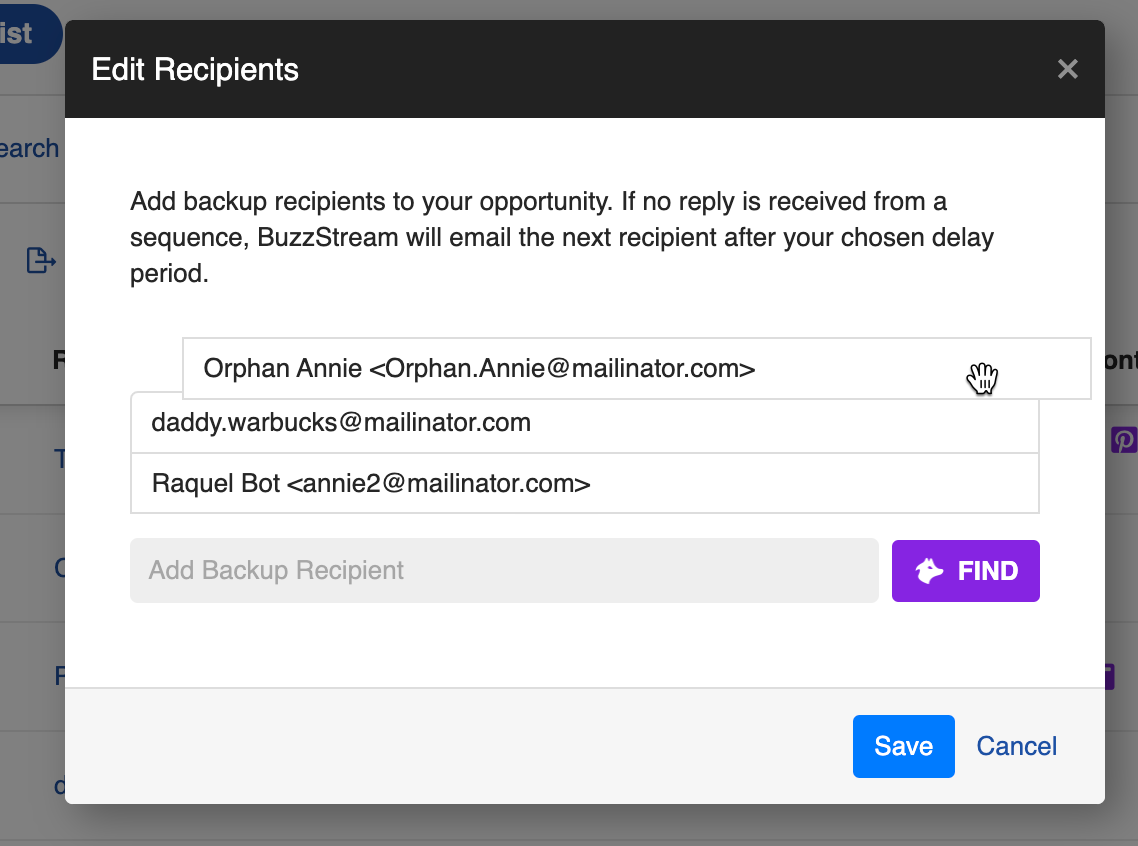
After you add a recipient for a website, just click into the Recipient field again and select the Add Backup Recipient option.

From here, select from email addresses or people you’ve added to a website that you think would be a good backup recipient. You can also add new people or email addresses right from here.

Now, send your outreach. You can send using backup recipients from anywhere in the app, but let’s just see how it works in Send Individually for now. You’ll notice that in addition to the Sequence stages you’re used to seeing in the new composer, you can also see the additional backup recipients you added.
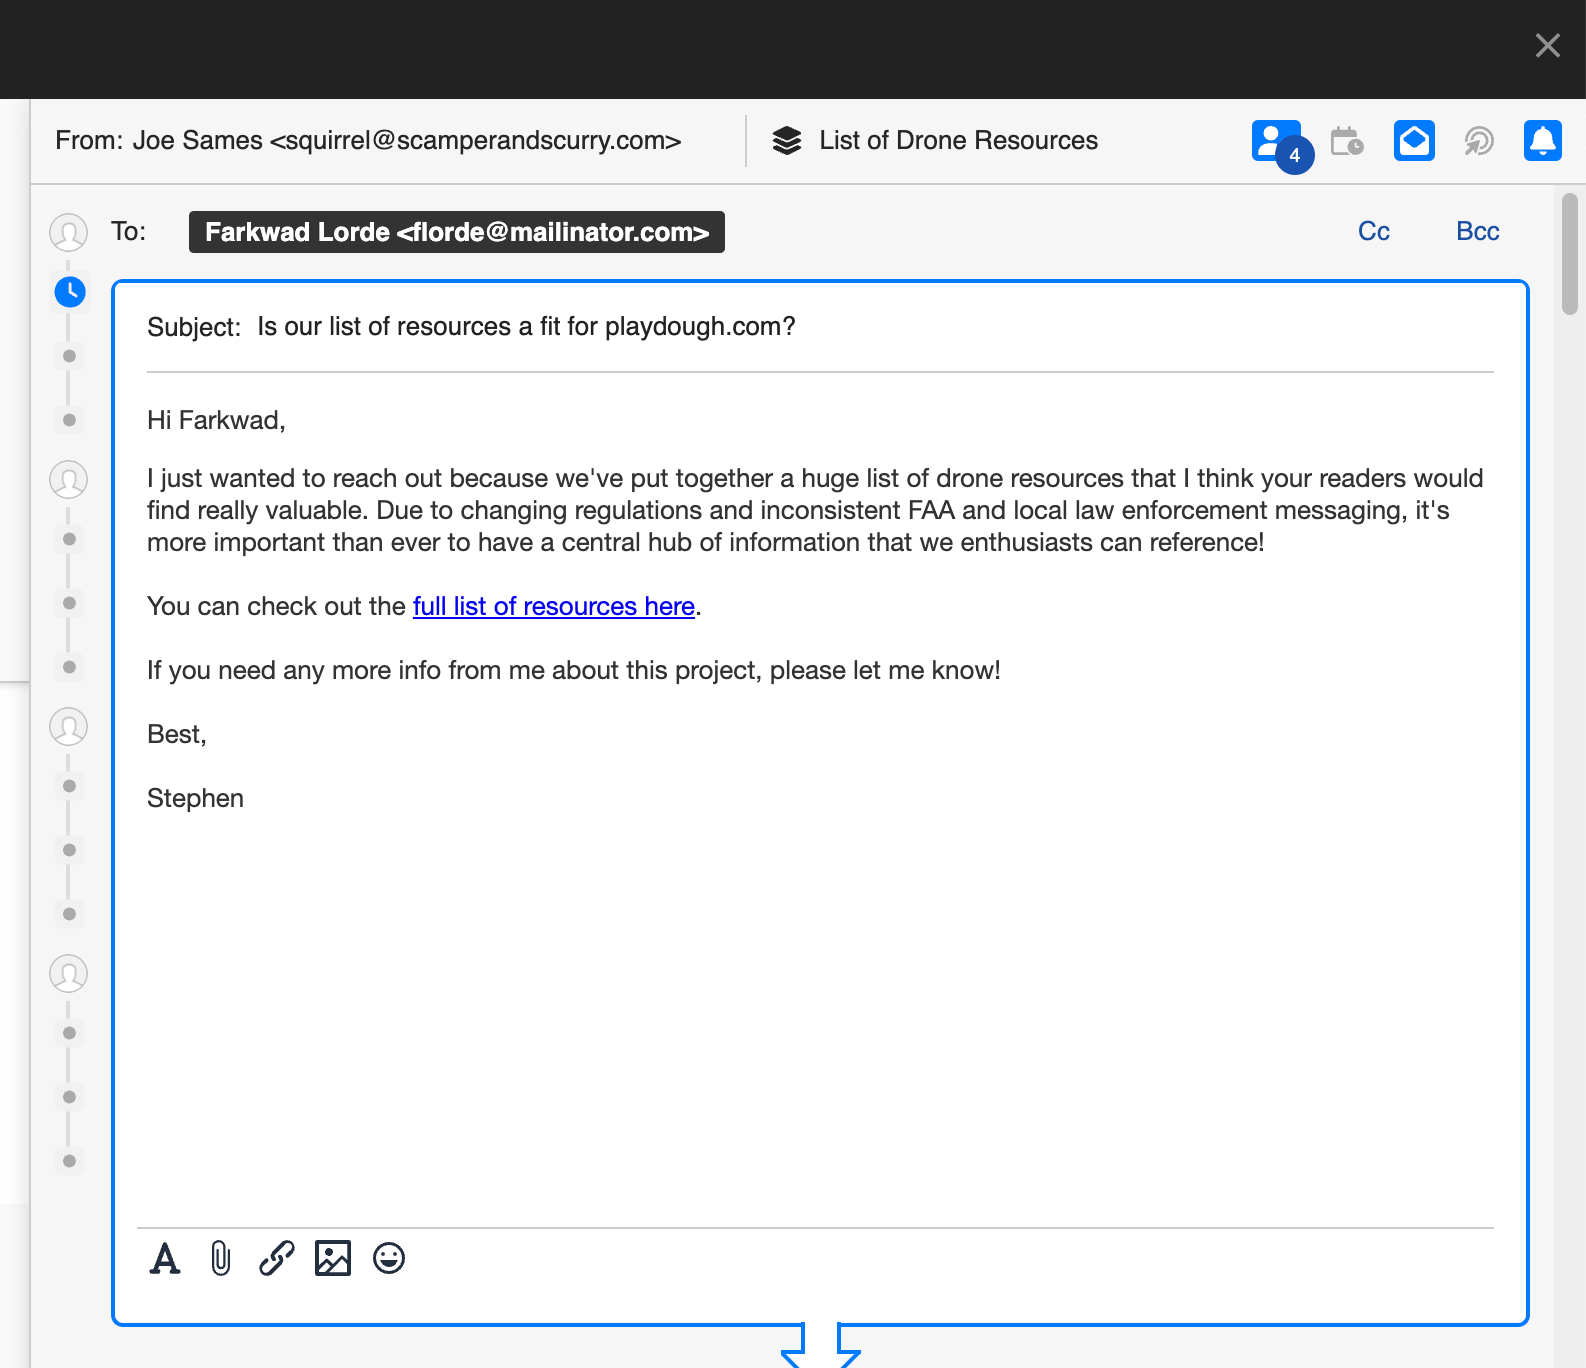
If you’d like, you can also personalize each stage for your backup recipients to tailor the messaging to that recipient specifically.
Once you’re ready, you can send your outreach. Now, BuzzStream will automate the process. If you don’t receive a reply from your first recipient, BuzzStream will automatically try sending to the next after a period of time you define.
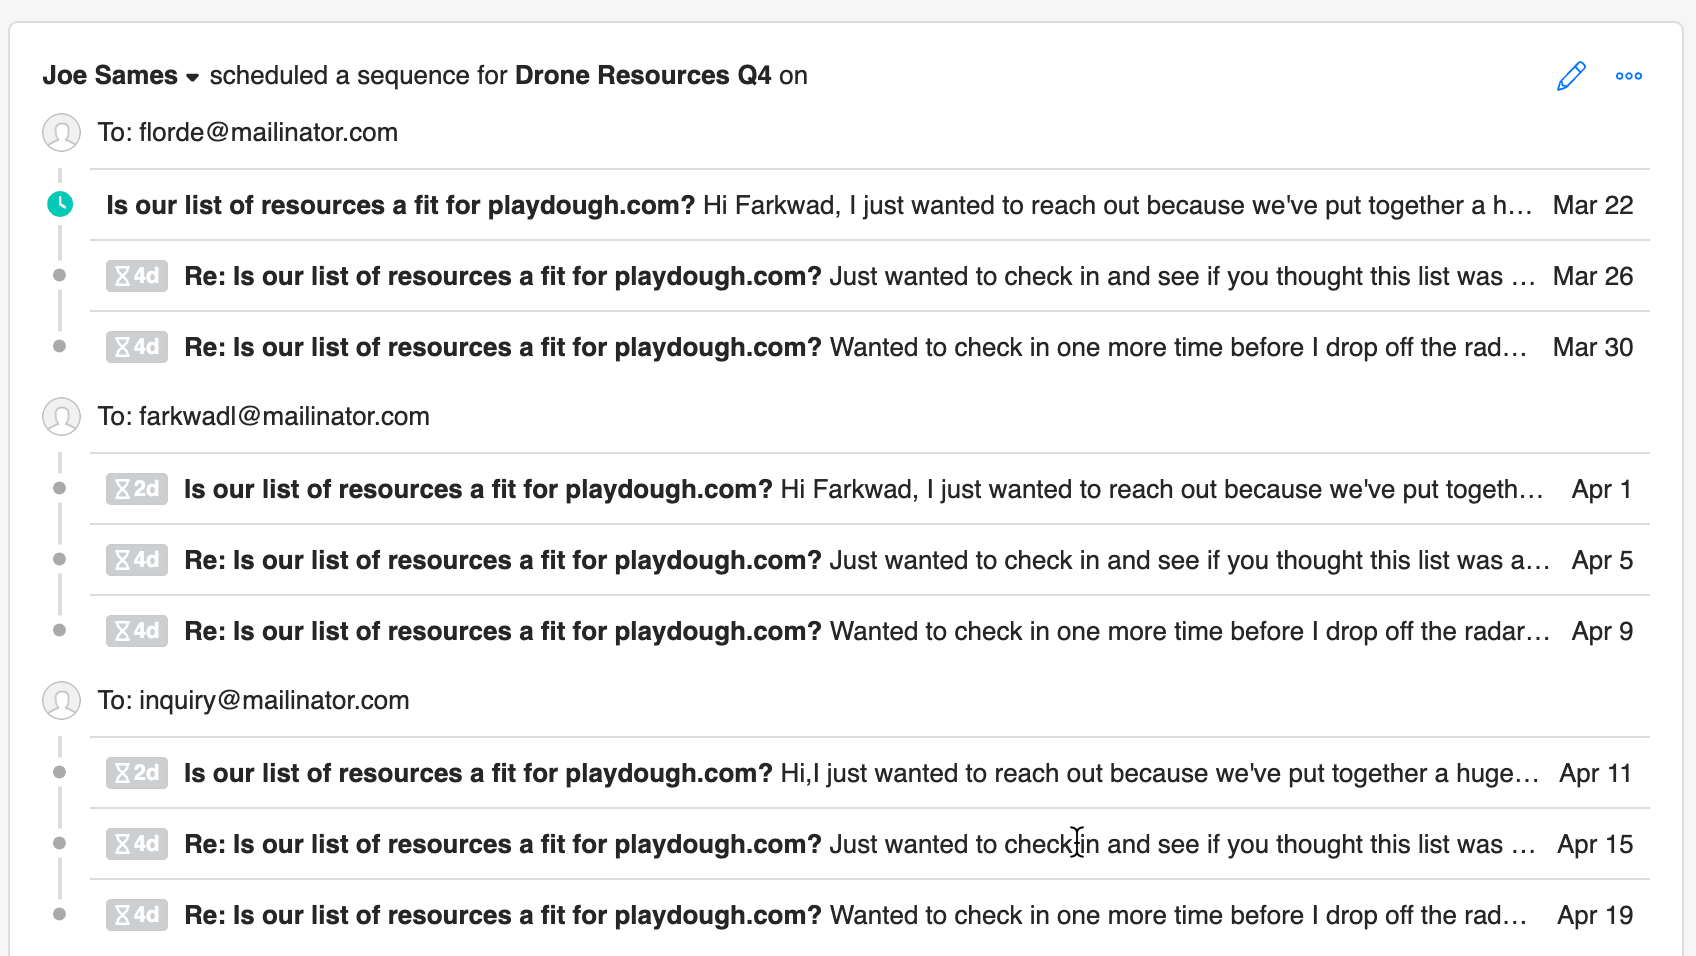
If you receive a reply from a recipient, then BuzzStream will stop sending any remaining stages of the sequence to that recipient and to any other backup recipients.
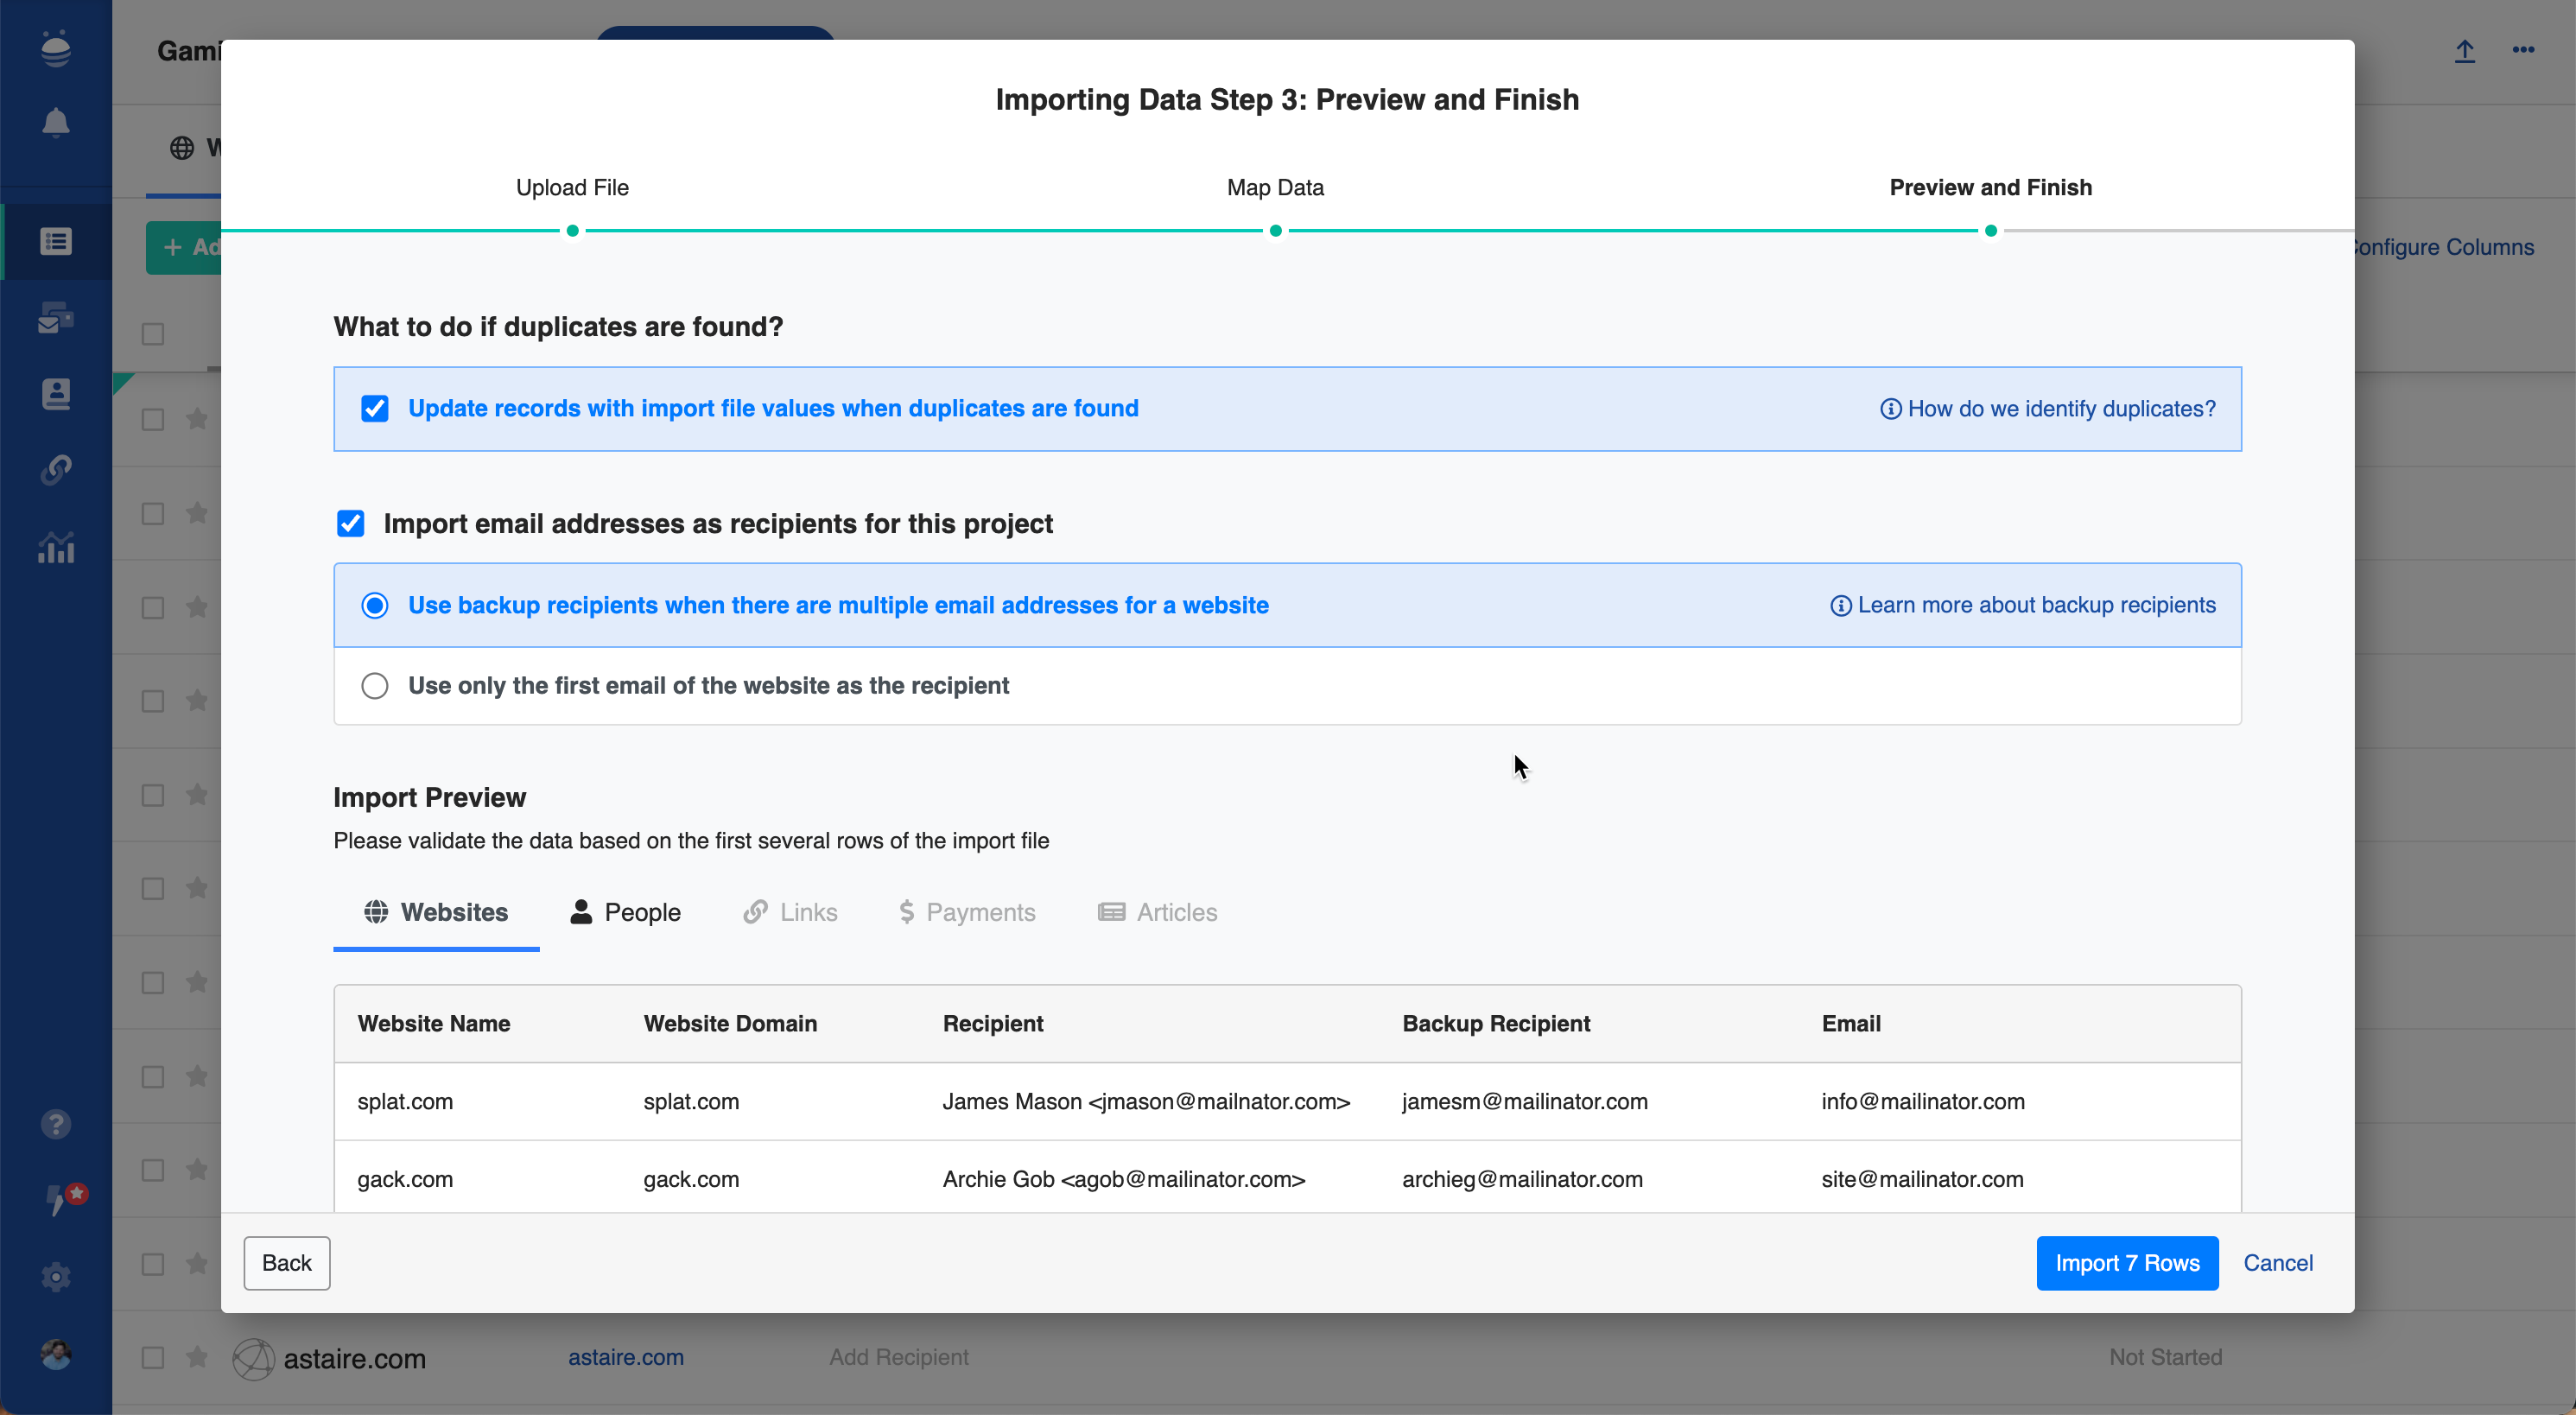
Importing Backup Recipients
In addition to adding backup recipients using the Recipient field, you can also import backup recipients directly. That way, you can quickly set up a whole campaign with backup recipients based on an existing CSV that you, your team, or outsourced partners have put together for you.
To do so, just make sure that you have a spreadsheet that includes multiple email addresses per website.
That can mean either having multiple rows with one recipient email in each (note: in order to import multiple people as recipients this is the way to do it)
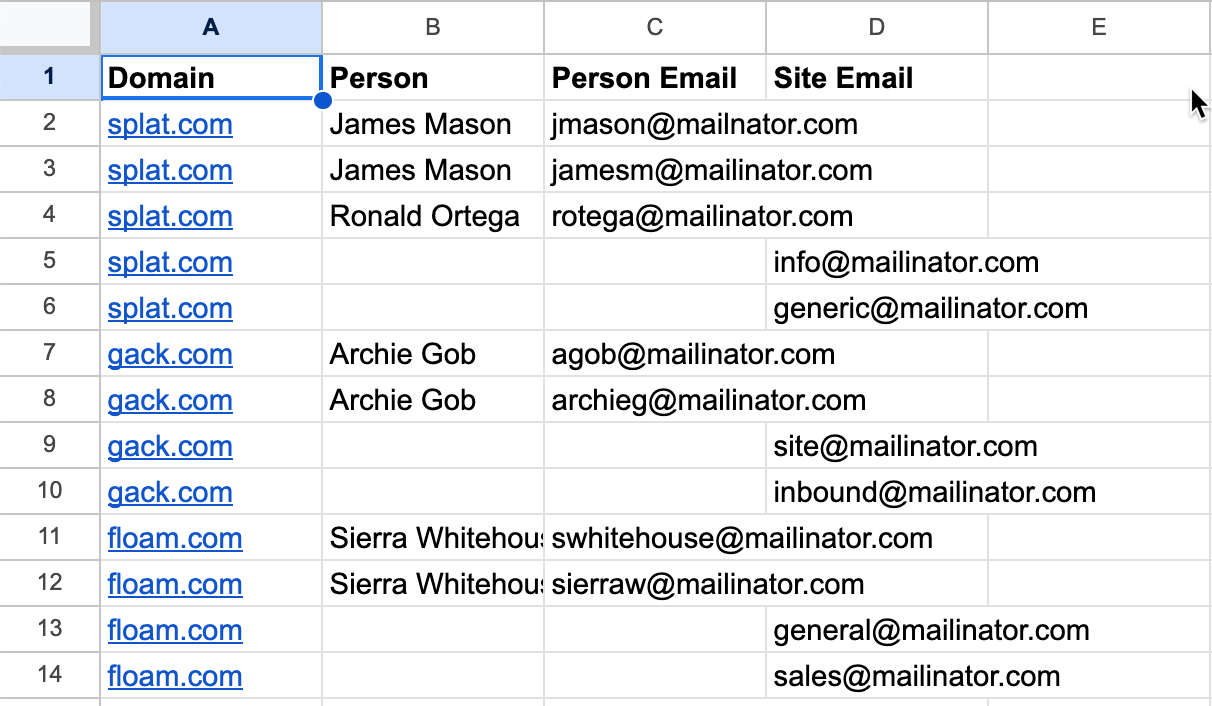
Or a CSV with multiple email addresses per row
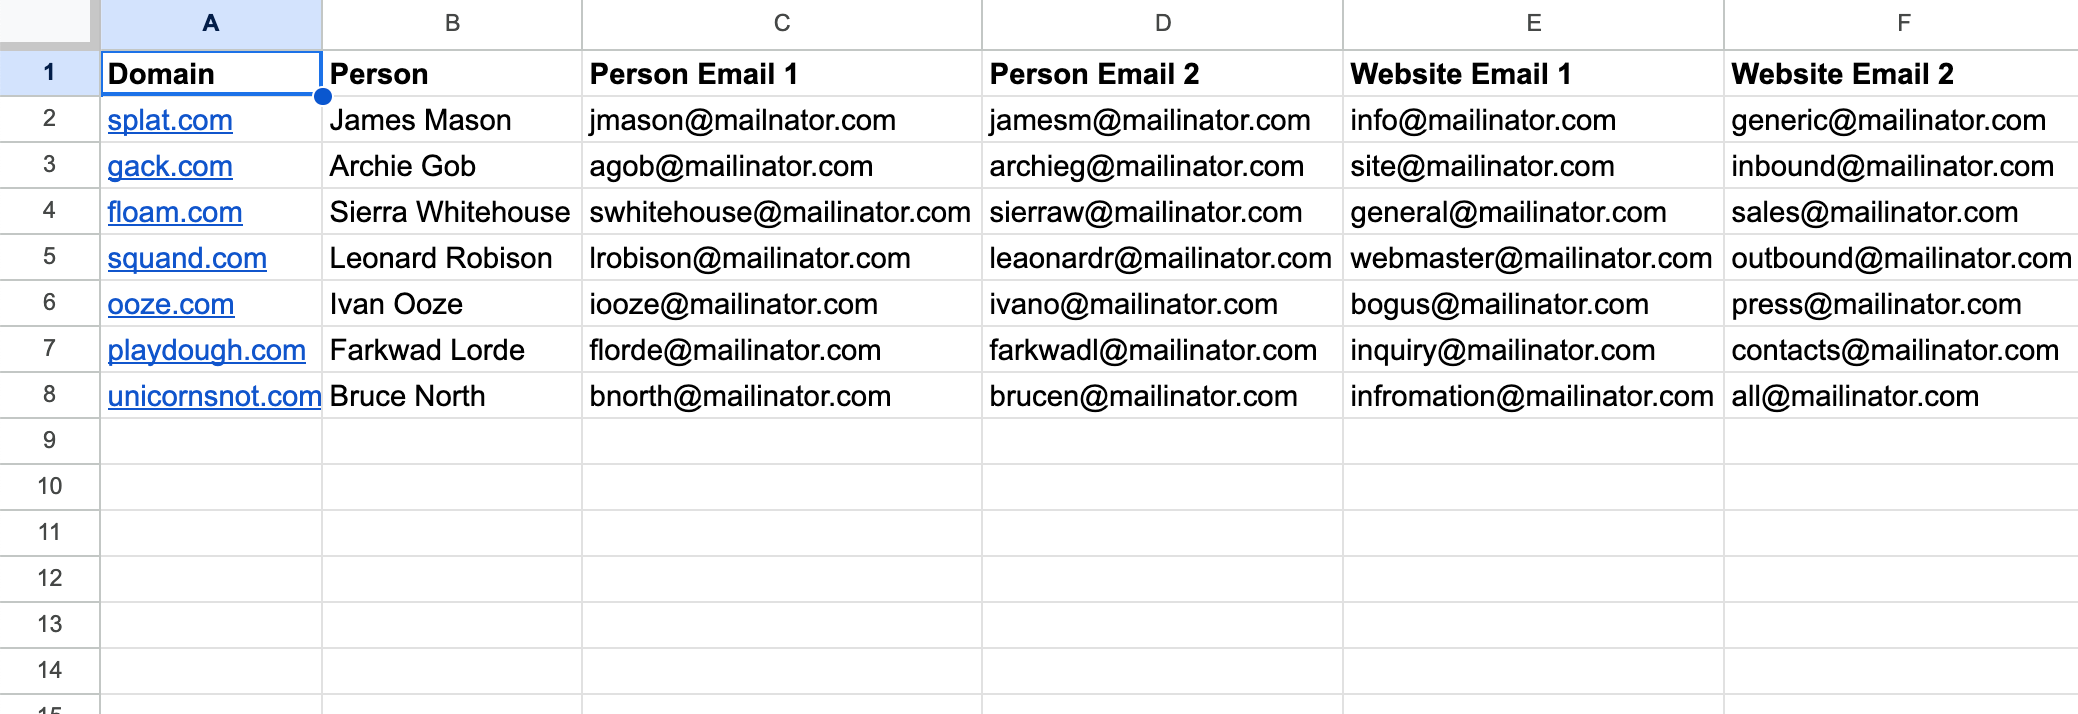
Either way, once you do so just associate your fields as normal, but make sure you select the option to add backup recipients on the preview and finish step and BuzzStream will take care of the rest!
Reordering Backup Recipients
BuzzStream gives you the ability to reorder your backup recipients as well. That way, if you decide at any point in time that one of your recipients for a website should be prioritized ahead of others when you’re sending outreach, it’s easy to take care of.
To reorder recipients, just click into the Recipient field and drag and drop your recipients in your preferred order.
You can even reorder recipients after you’ve started sending your sequence in the same way, as long as they aren’t the recipient that is actively being sent to.
We’ve just released an update to significantly improve the BuzzStream composer. Now, you’ll experience a much more streamlined experience when composing and editing your emails, and will also be able to get better visibility into your sequence activity.
Here are just a few highlights from the new update:
We’ve changed the composer from a tabbed horizontal layout to a scrollable in-line layout. This means you can see all of your sequence stages and maintain context without having to click back and forth between tabs.
The composer now pops out in its own minimizable window when sending from the contact record, so you can more easily navigate around your records while still interacting with the composer.
We’ve included an active sequence summary in your History tab so you can more easily get at-a-glance insight into the active sequences for your contacts.
Check out our blog post for all the details.
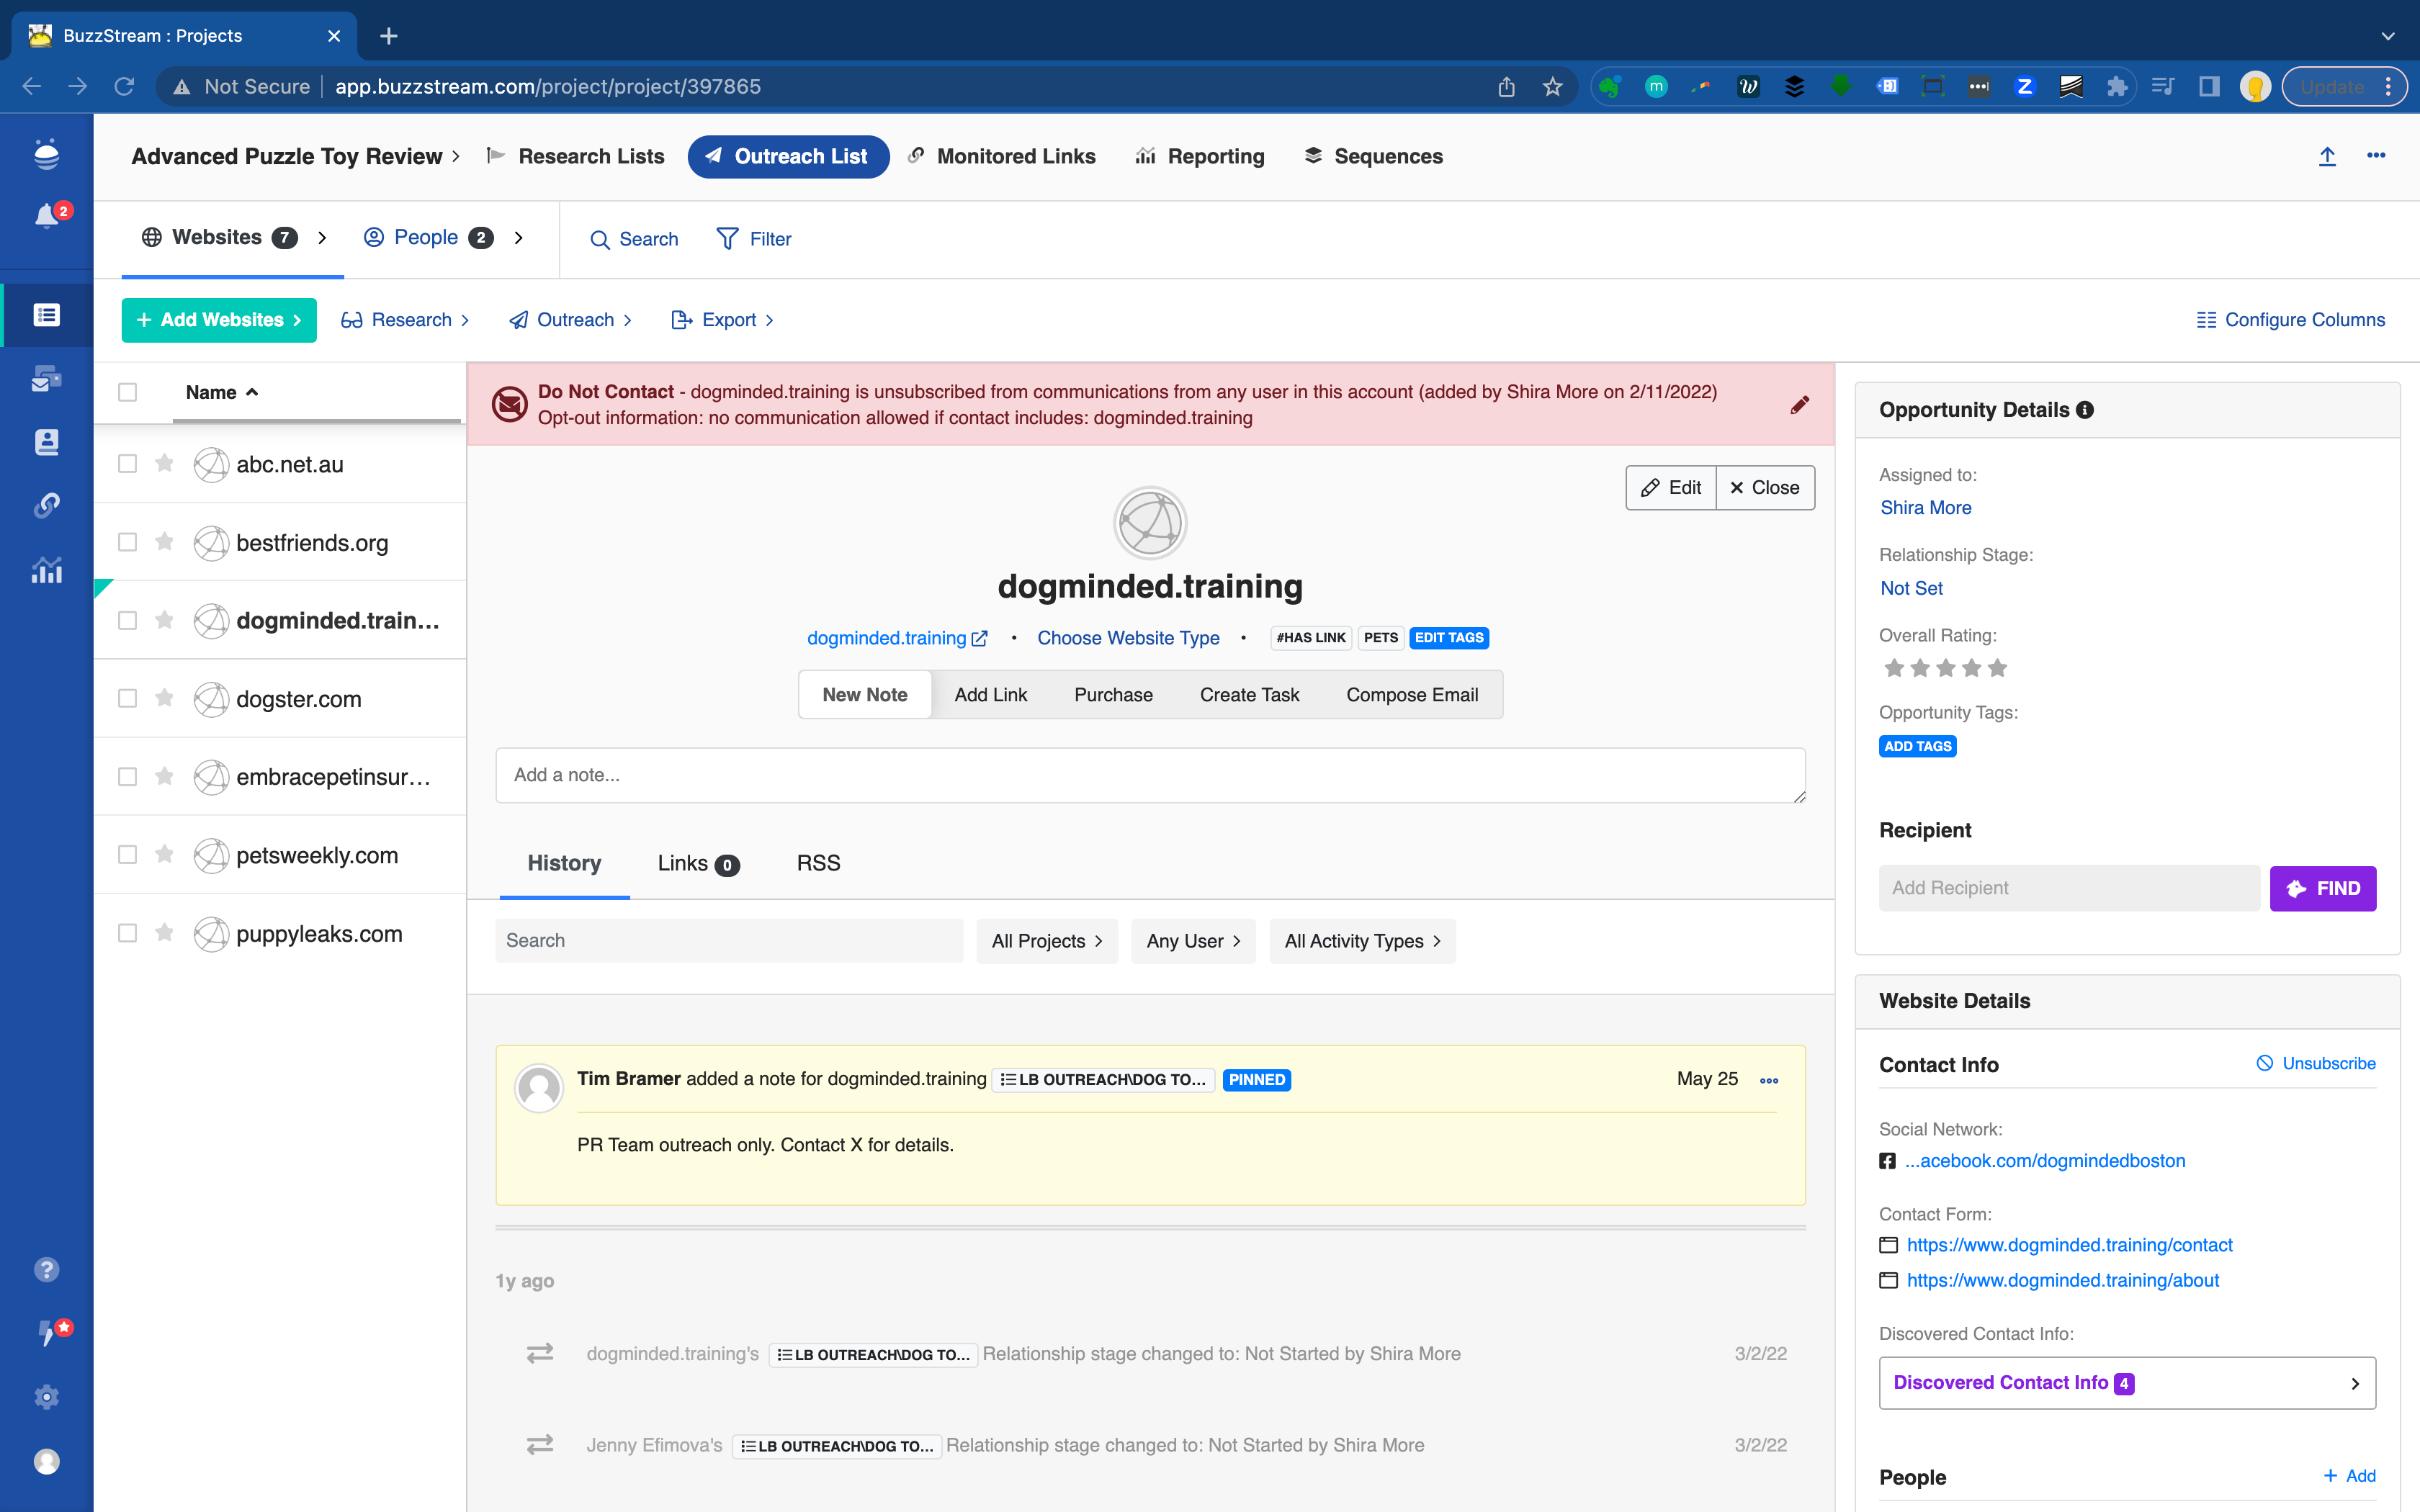
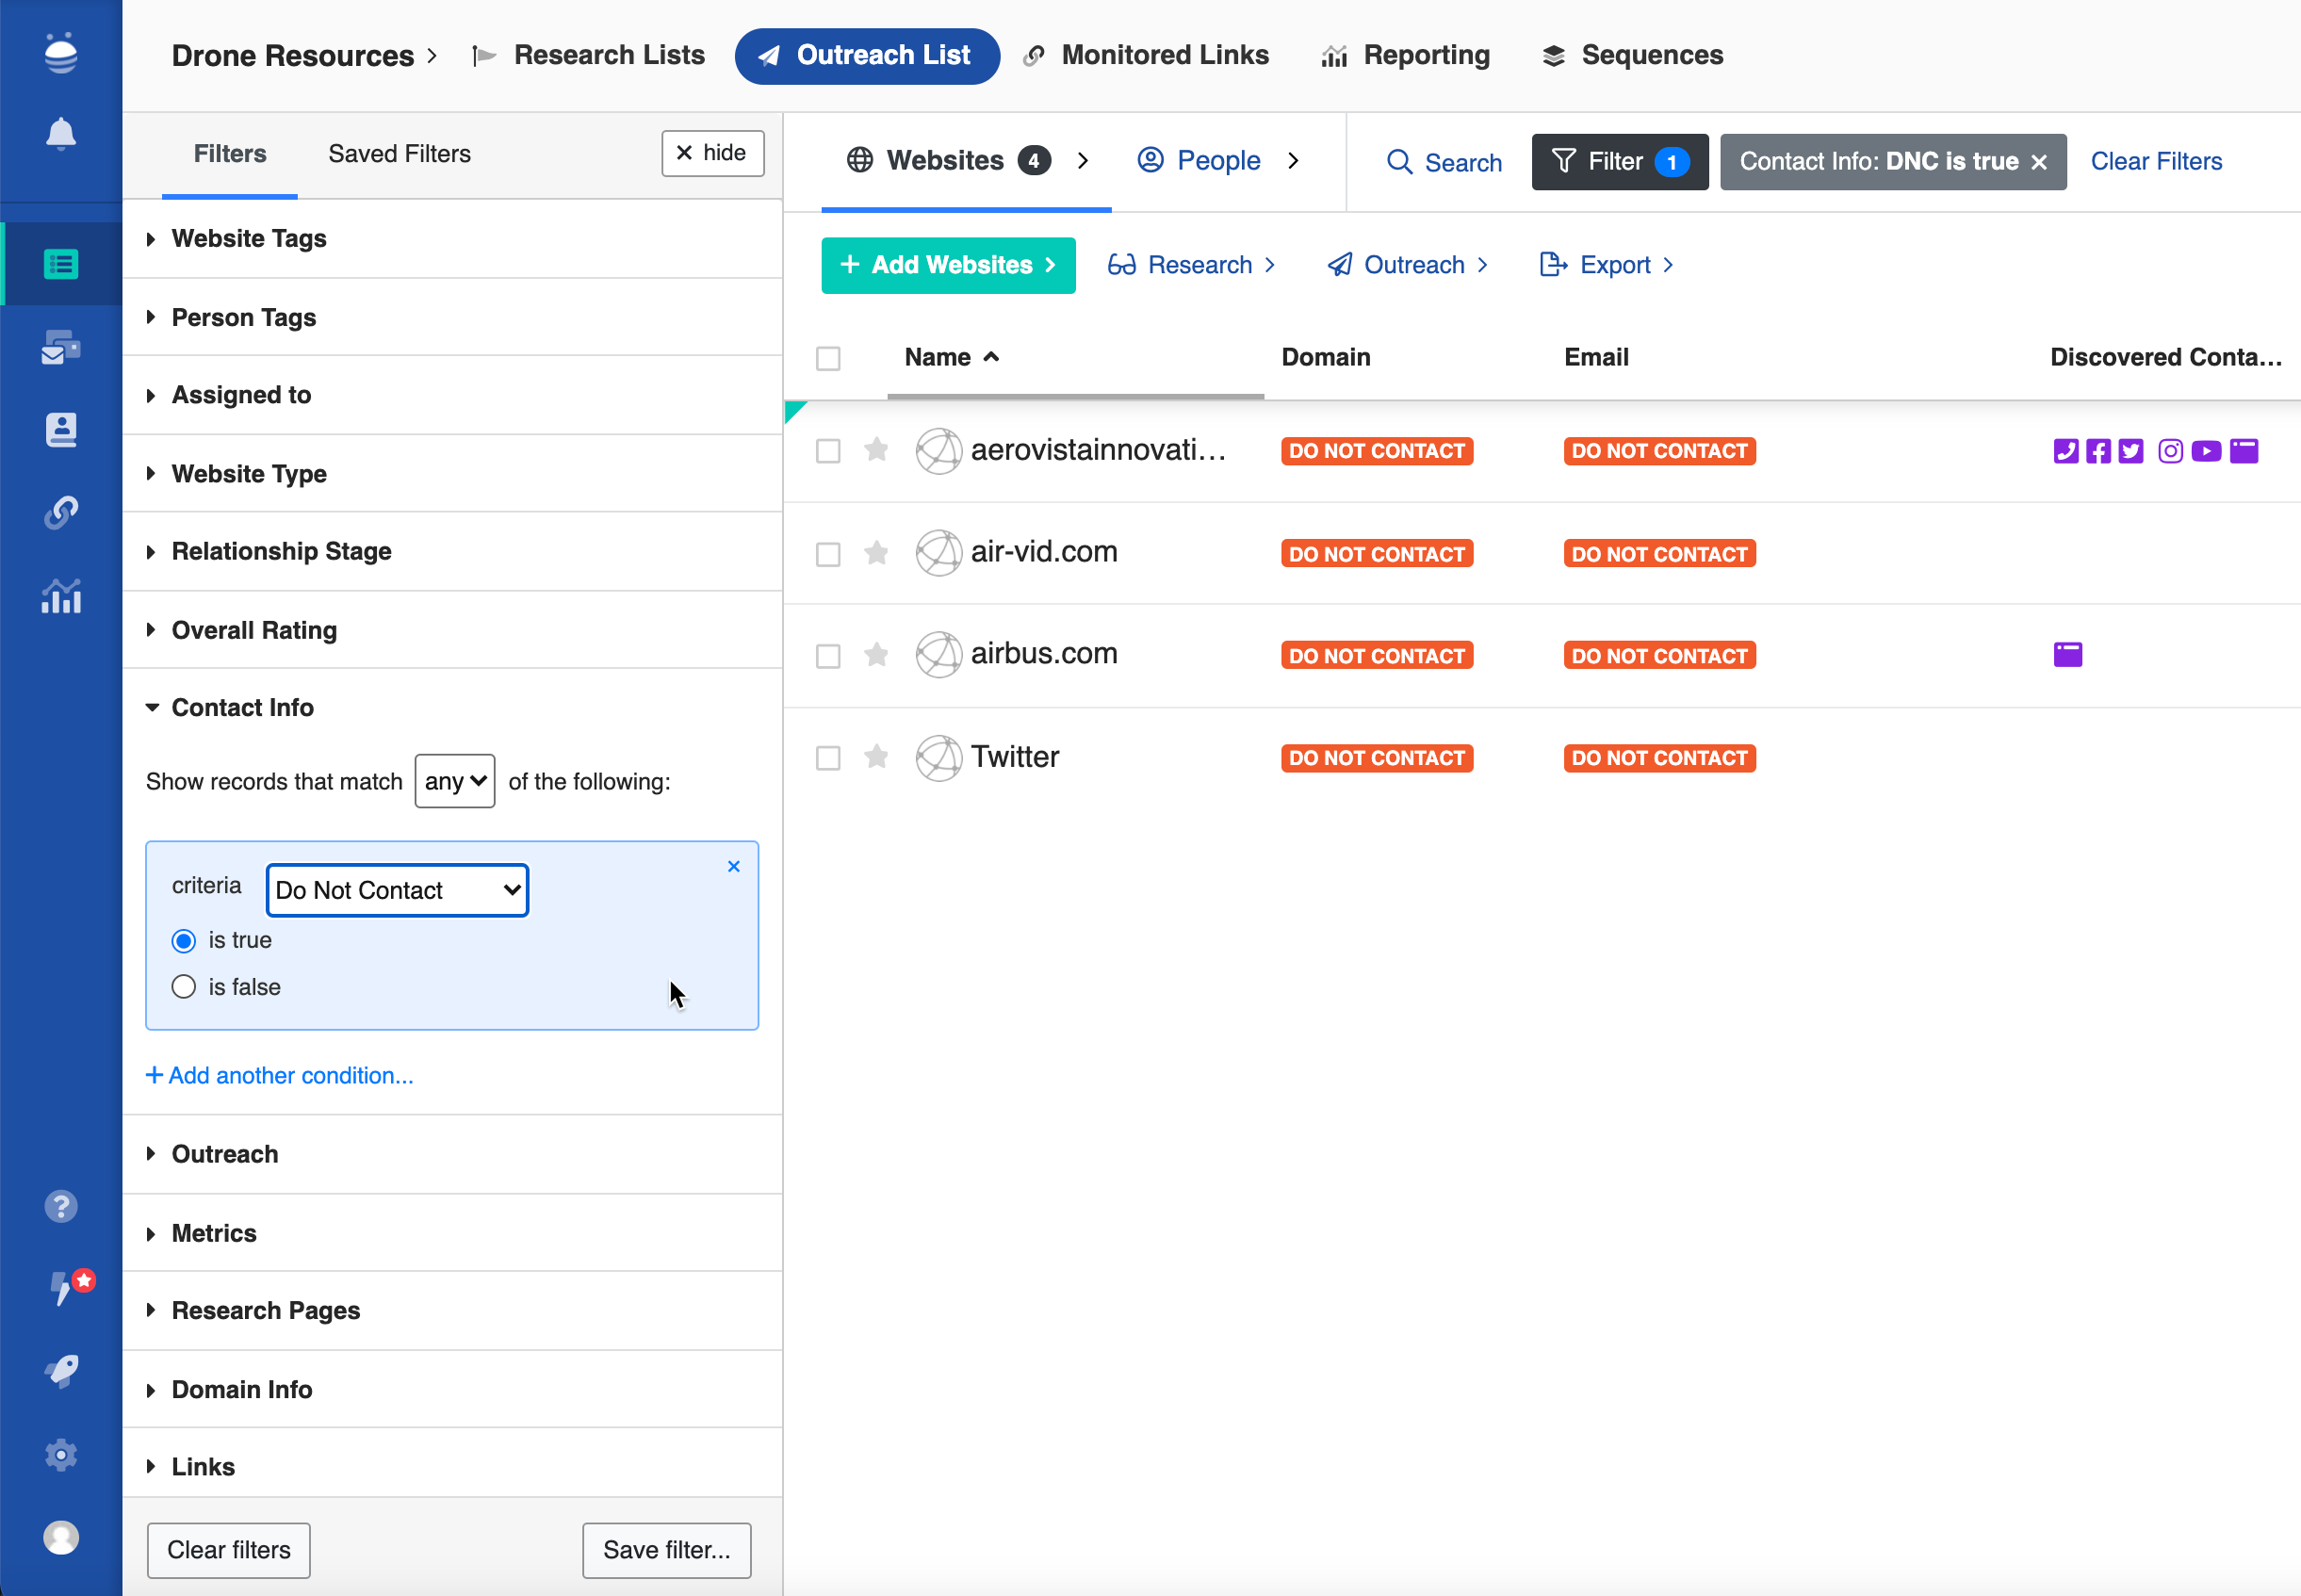
We’ve added Do Not Contact filters into BuzzStream so you can much more easily take action (or avoid taking action, as the case may be) on contacts you’ve marked as Do Not Contact.
Accessing and using these filters is dead simple. First, just navigate to the filters section in your project.
Next, open your Contact Info filters and select Do Not Contact as your criteria.
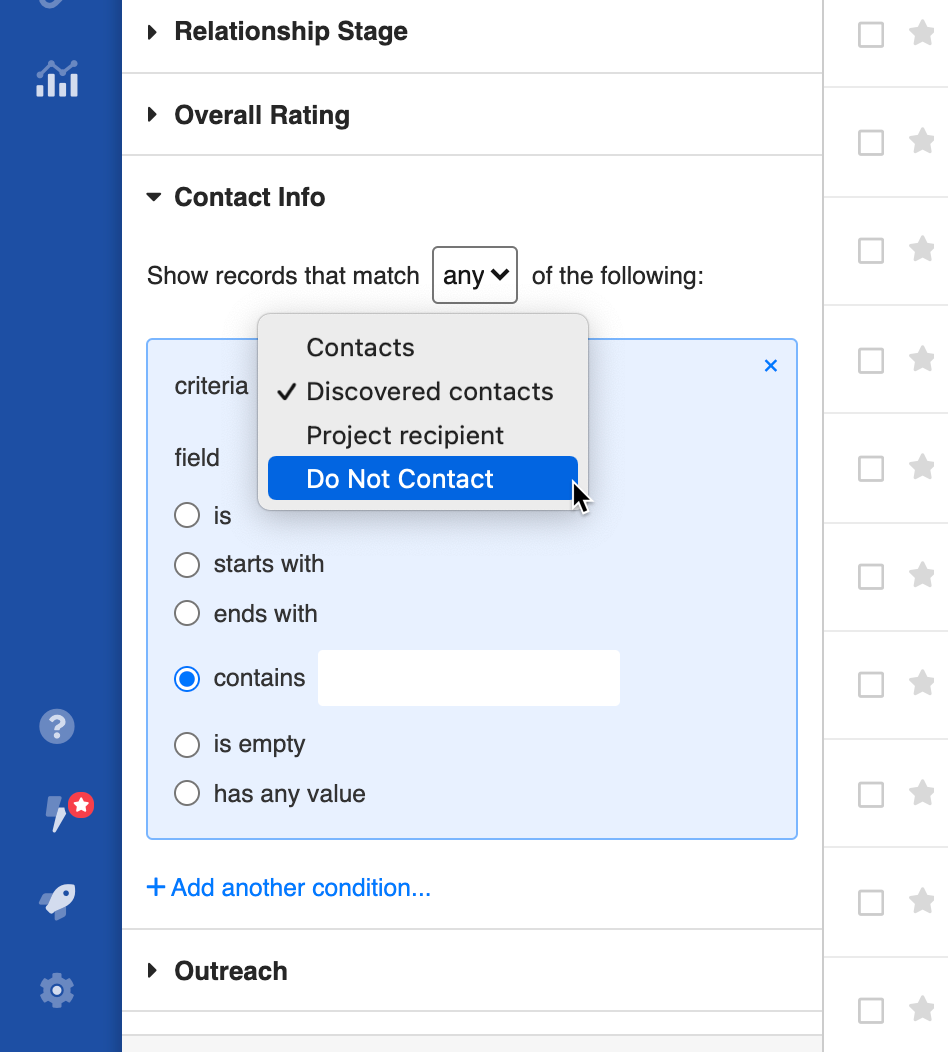
Finally, just select True to show only records that you’ve marked as Do Not Contact, or False to filter those contacts out of your list.
We hope that this new feature is helpful in giving you more control over who you reach out to in your campaigns so you can be confident you aren’t engaging with anyone who you or your team has determined shouldn’t be contacted.
If you have any questions about this new filter or anything else, don’t hesitate to reach out.
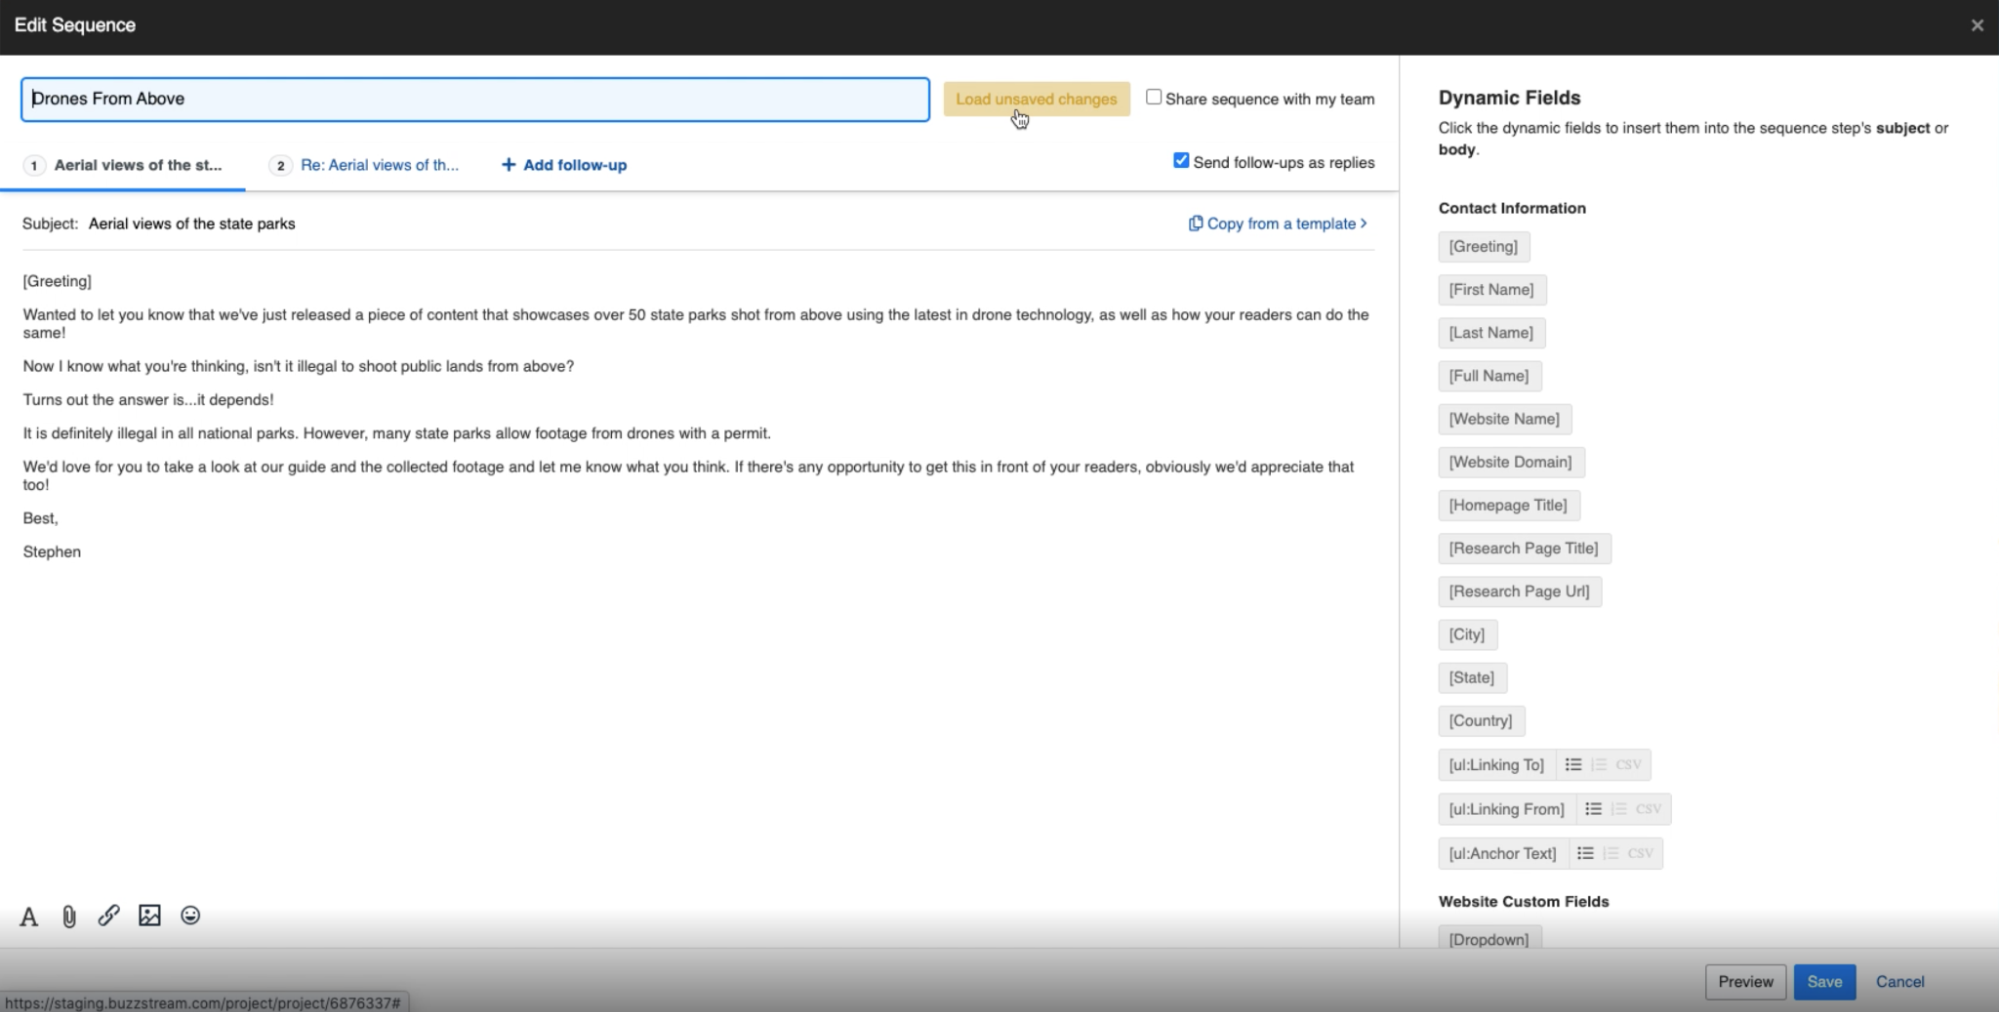
When you’re working on a sequence or template, issues may occur -- maybe you accidentally close your tab or navigate away. In the past, this has meant that you might lose your progress.
Now, we’ve added an auto-save feature that will allow you to recover your progress on a sequence or template. Whether you are creating a new sequence/template or working on an existing one, your changes will be saved and ready to re-implement should any interruptions occur.
Here’s how it works if you’re creating a new sequence/template:
Say you’ve just created a new sequence.
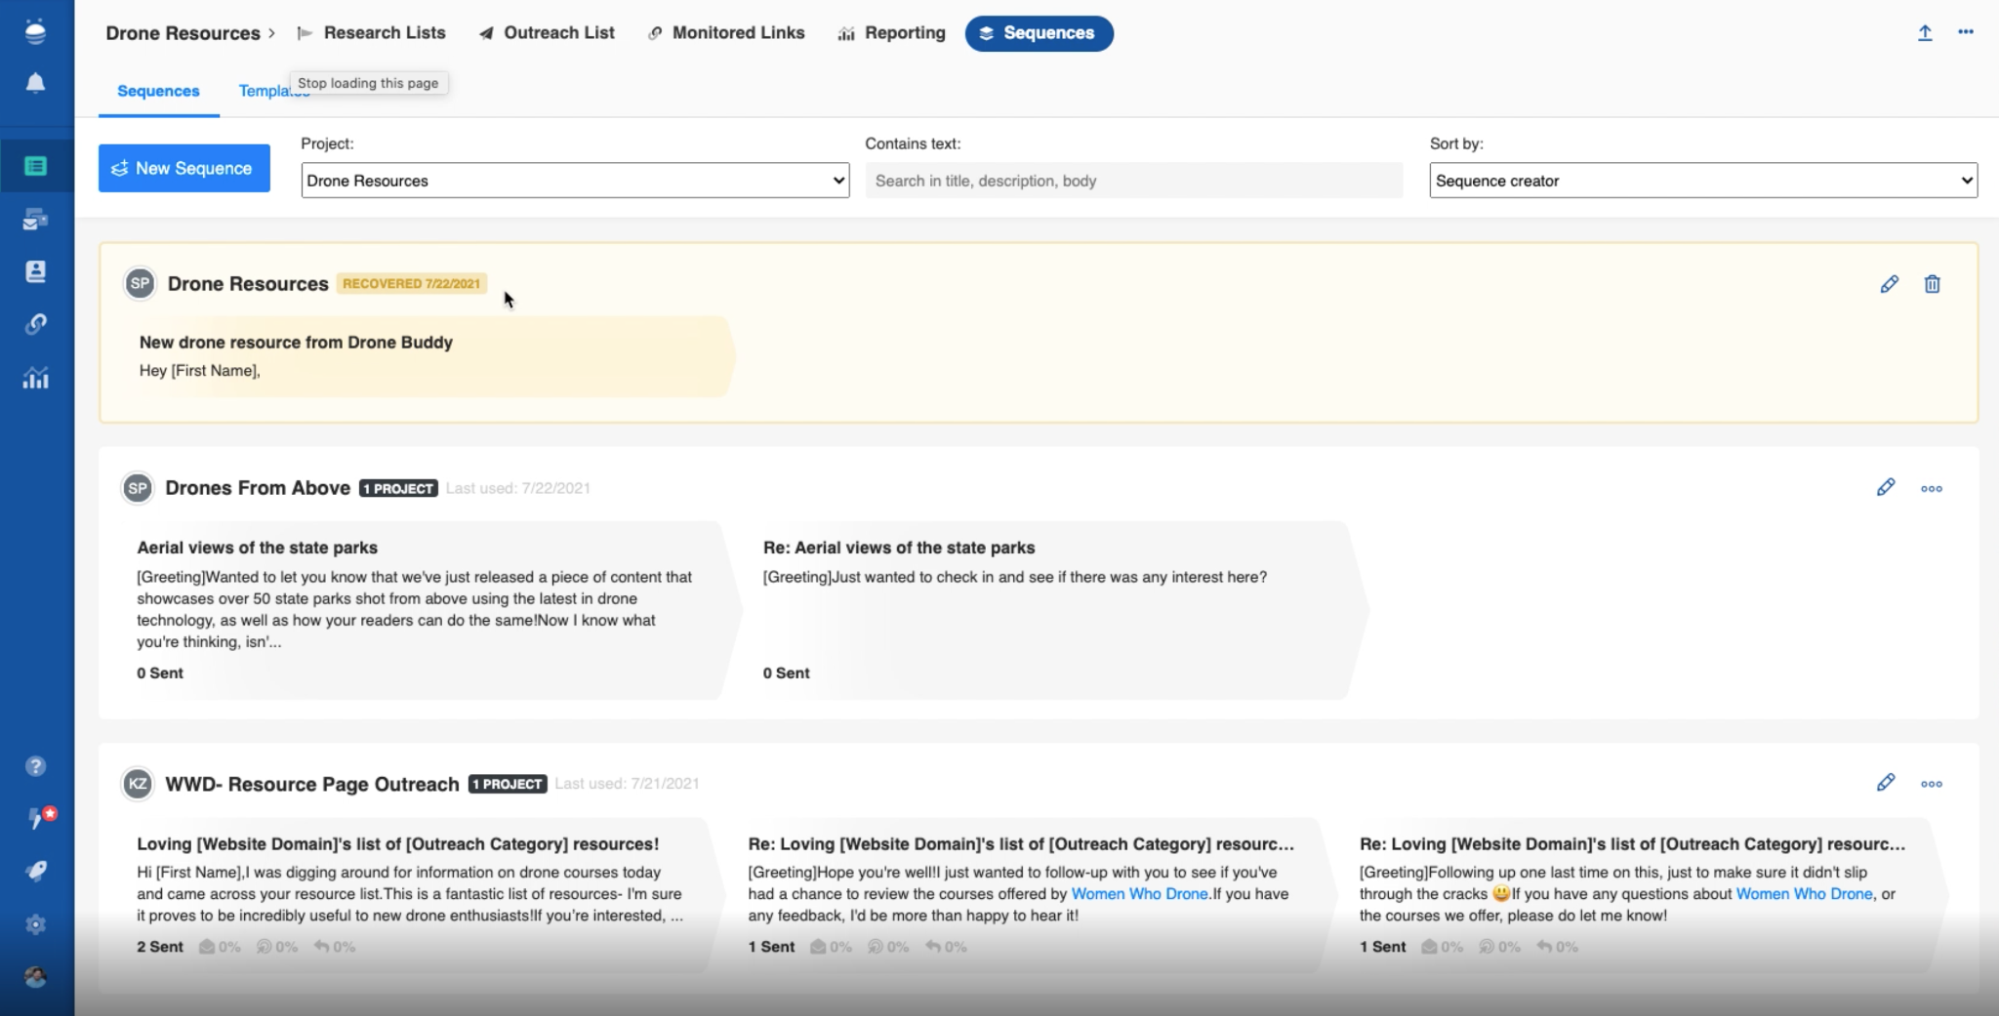
If you unintentionally navigate away or otherwise close the app, once you navigate back to your sequences, you will find that this new sequence has been recovered.
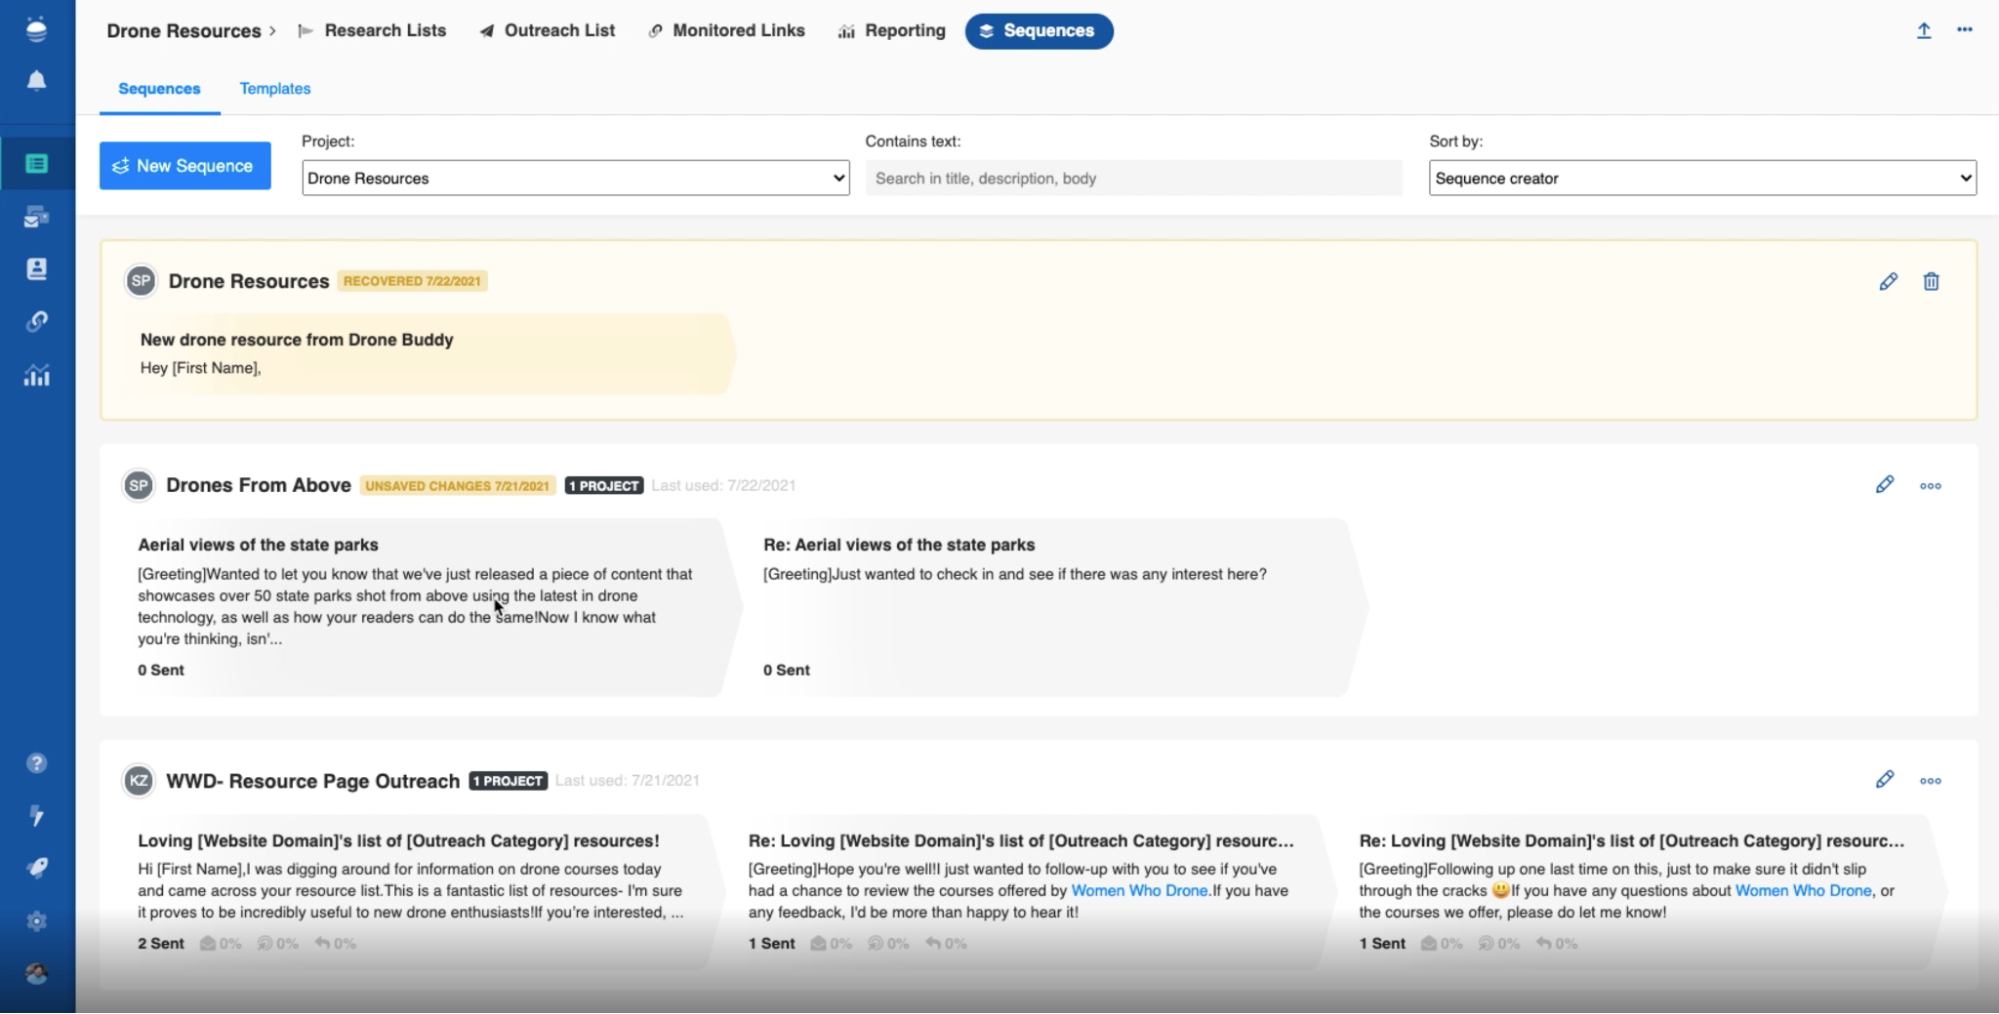
Here’s how the feature works when you’re working on an existing sequence/template:
Say you’re editing an existing sequence.
Should you experience any issues, your unsaved changes on the existing sequence will be recovered.
Once you go into your sequence and resume editing, you can click “Load unsaved changes’, and your changes will be recovered.

We’ve added a filter that allows you to see which of your contacts have been sent a full sequence (including those that you
cancelled
the sequence for). This is beneficial in the case that you want to reach out to multiple contacts at the same company. By seeing the contact(s) with which you have completed your line of communication (i.e., completed all stages of their sequence), you'll know to begin reaching out to another contact at the same company.
To access the 'Sequence Complete' filter:
1) In ‘Projects’, go to ‘Outreach List’.
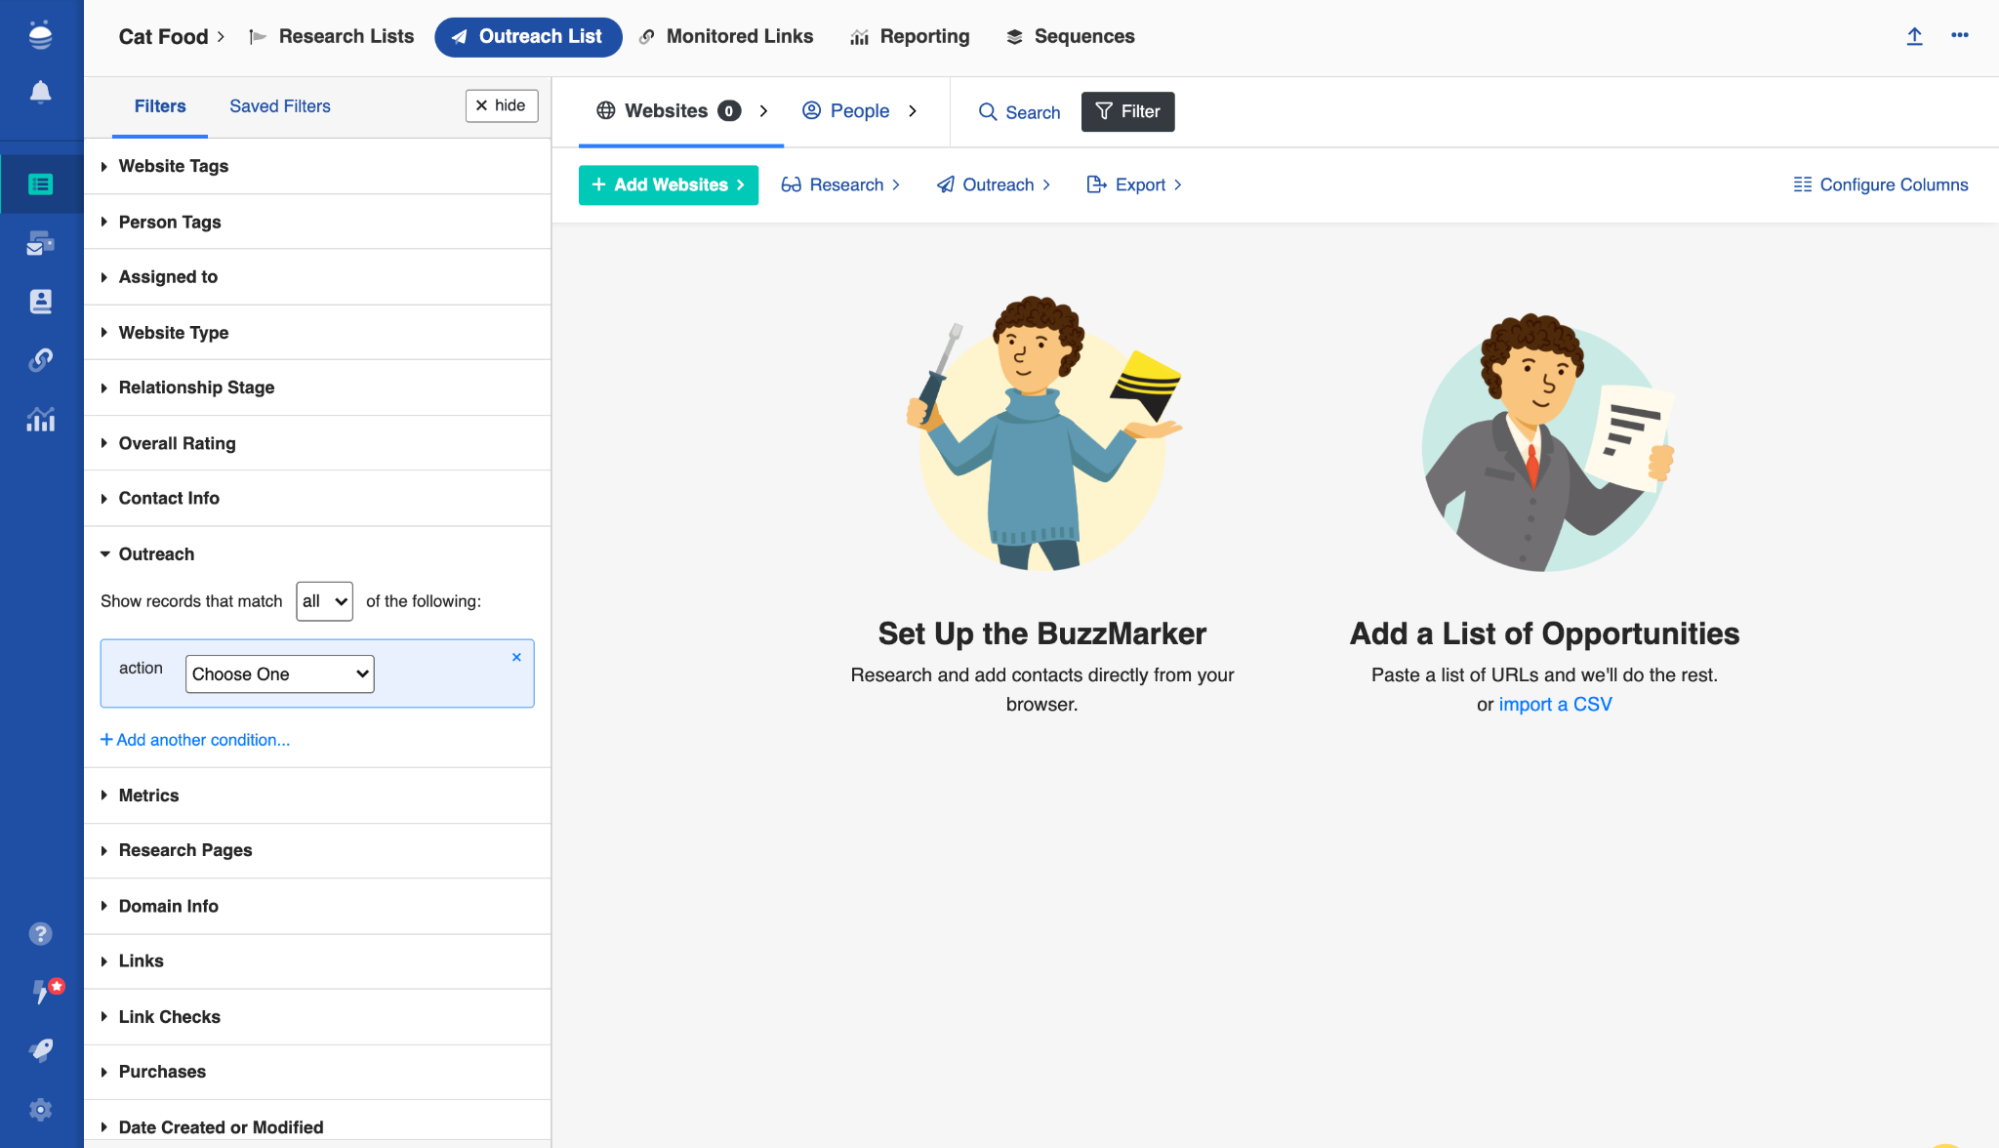
2) Go to ‘Filter’ and click on ‘Outreach’.
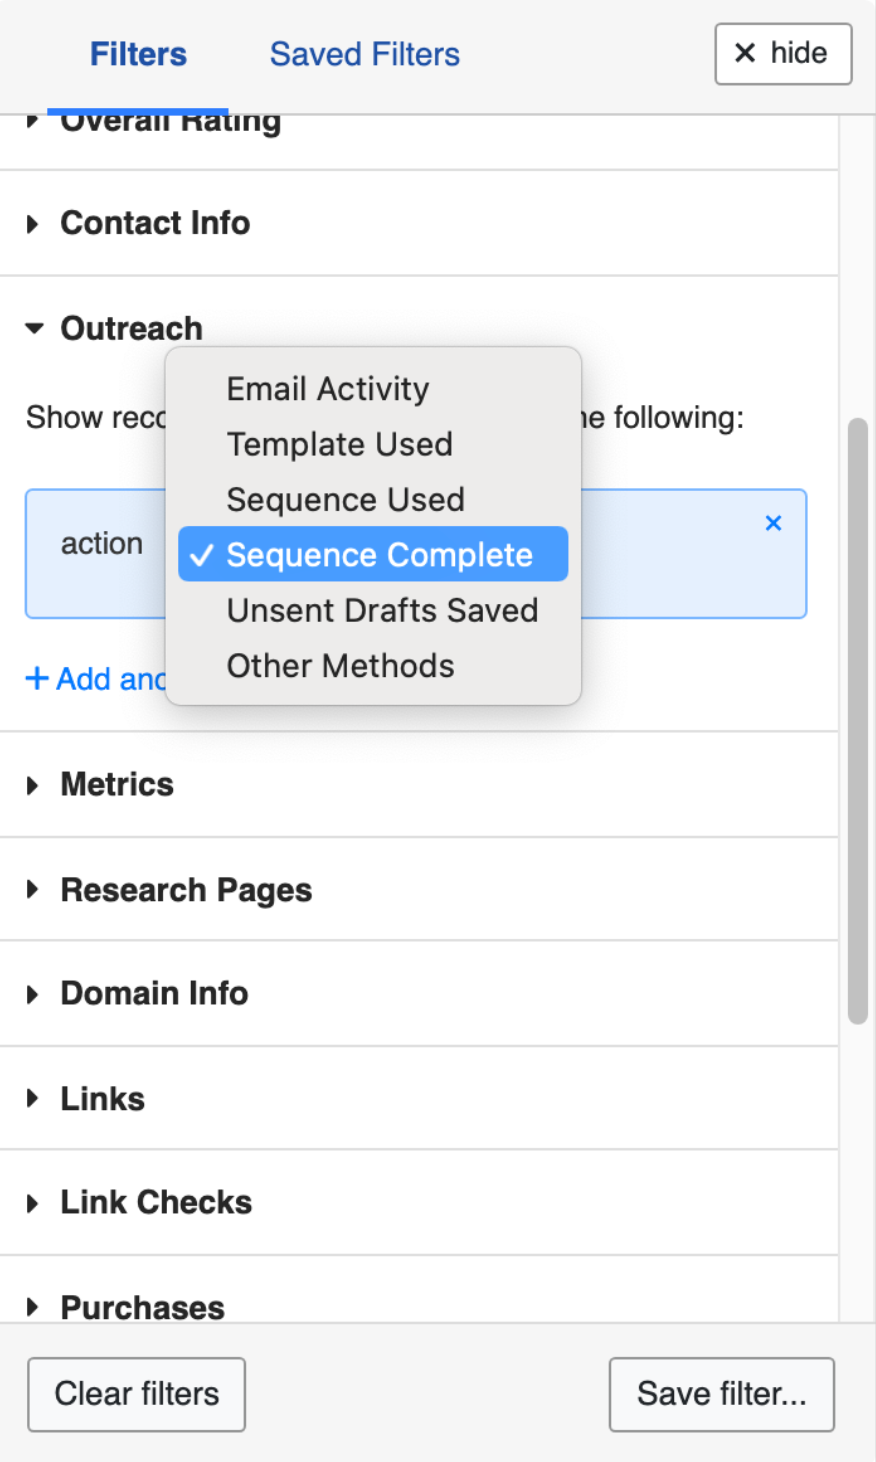
3) In the dropdown menu, find the ‘Sequence Complete’ filter.
Load More
→